
Start your
portable desktop.
From download to desktop in about fifteen minutes. You need a USB drive of 8 GB or more (16 GB or more is better) and a computer that can start from USB.
Download and check the image
Download the
.img.xzfile from the download section. Do not unpack it; UUI Py and the other tools below read it directly.To check it arrived intact, compare its SHA-256 checksum with the one published on the download page. Linux or macOS:
sha256sum pendrivelinux-os.img.xz. Windows PowerShell:Get-FileHash .\pendrivelinux-os.img.xz. If they differ, download it again.Install it on the USB drive
Recommended: Universal USB Installer (UUI Py) version 1.0.0.3 or newer, from pendrivelinux.com (Windows and Linux). It installs PendriveLinux OS next to the UUI boot menu, so the same drive can still boot other tools and distros. The steps below are also in the UUI Py guide.
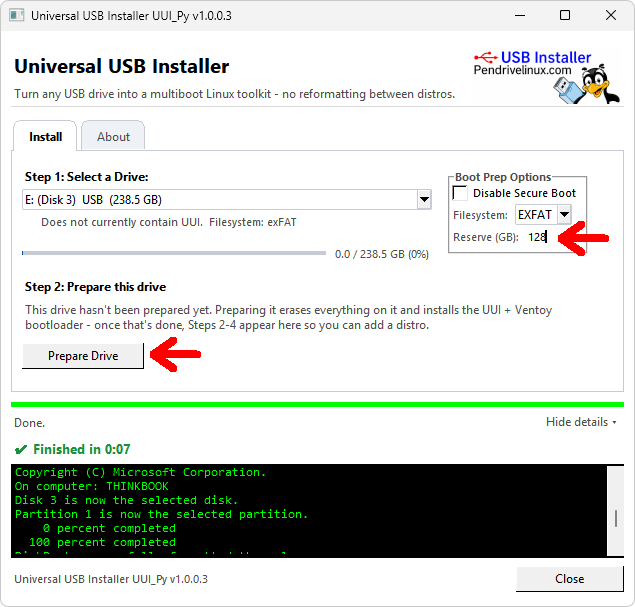
- Prepare the drive. Select your USB drive and set Reserve (GB) to leave room for PendriveLinux OS, then click Prepare Drive. This erases the whole drive, so back up anything on it and check you've picked the right one.
- Install the OS image. Open the OS Image tab, click Install OS Image… and choose the downloaded
.img.xzfile. UUI reads it directly and writes it to its own partition, which takes several minutes. On Windows, run UUI Py as Administrator.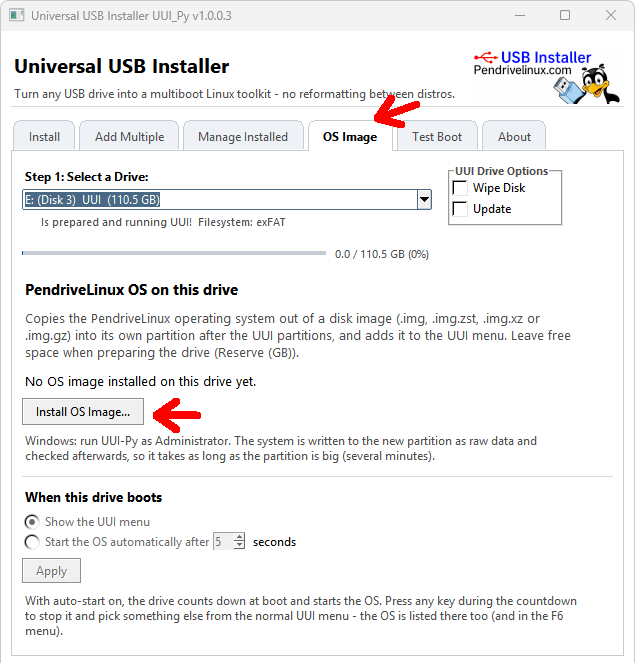
- Choose how it boots. Under “When this drive boots”, show the UUI menu or start PendriveLinux OS automatically after a countdown. Press any key during the countdown to pick something else.
Raw write: you can also write the image straight to a drive with
ddor any other tool that writes raw disk images. This uses the whole drive for the OS and erases everything on it. On Linux, find your drive withlsblk, make sure it is unmounted, then decompress and write in one step, replacing/dev/sdXwith your USB drive (the whole device, not a partition):xzcat pendrivelinux-os.img.xz | sudo dd of=/dev/sdX bs=4M status=progress conv=fsync. Writing to the wrong device can destroy your data, so double-check the name first.- Prepare the drive. Select your USB drive and set Reserve (GB) to leave room for PendriveLinux OS, then click Prepare Drive. This erases the whole drive, so back up anything on it and check you've picked the right one.
Start the computer from the USB drive
Restart the computer and open its boot menu while it starts. The key depends on the maker; common ones are
F12,F10,F9,EscorF2. Choose the USB drive (it may be listed as “UEFI” and the drive's name). Both BIOS and UEFI computers work, and Secure Boot is supported.Sign in and run the first-run setup
The first login is the user
pendrive. A short wizard asks you to choose a password, your keyboard and your timezone. It also asks whether to keep part of the drive as storage that Windows, macOS and Linux can all open. Linux gets the rest. That choice can't be changed later without reformatting, so decide before you click Next.The first boot expands the system to fill the drive, so it takes a little longer than later ones.
Find your way around
Open the penguin menu at the left of the taskbar for apps and Settings. Right-click the desktop for display settings, such as screen resolution. Press
F1at any time for a list of shortcuts. A graphical app installer is in the menu for adding more software.
If something doesn't work
- It starts Windows instead. Open the boot menu again and choose the USB drive. Some computers need Fast Boot turned off in their firmware setup.
- The USB drive isn't listed. Try another USB port, preferably one directly on the computer, and install the image again.
- No Wi-Fi. The image includes the non-free firmware most Wi-Fi chips need, but very new hardware can need newer firmware. Connect with a cable or phone tethering and install the system updates.
- It doesn't appear in the UUI menu. Check that you set a Reserve (GB) when preparing the drive, then look for PendriveLinux OS on the OS Image tab. Pressing F6 at the UUI menu lists it too.