Convert FAT32 to NTFS Without Losing Data. Do you need to store files larger than 4GB on a FAT32-formatted drive? The FAT32 file system has a limitation that prevents you from doing so, making it necessary to convert to NTFS. Luckily, you can convert FAT32 to NTFS without losing your data or needing to reformat. In this tutorial, we'll walk you through the process step by step.

Why Convert FAT32 to NTFS?
The FAT32 file system is widely used due to its compatibility across operating systems, but it has significant limitations:
- FAT32 cannot handle individual files larger than 4GB.
- Partition sizes are limited to 8TB.
- It lacks modern features like encryption, permissions, and journaling found in NTFS.
Converting to NTFS allows you to overcome these limitations while preserving your existing data.
Converting FAT32 to NTFS Without Losing Data
You can easily convert FAT32 to NTFS from within Windows or Linux. Outlined below are steps for both operating environments.
How to Convert FAT32 to NTFS from Windows
Here's how to perform a FAT2 filesystem conversion without losing data from Windows:
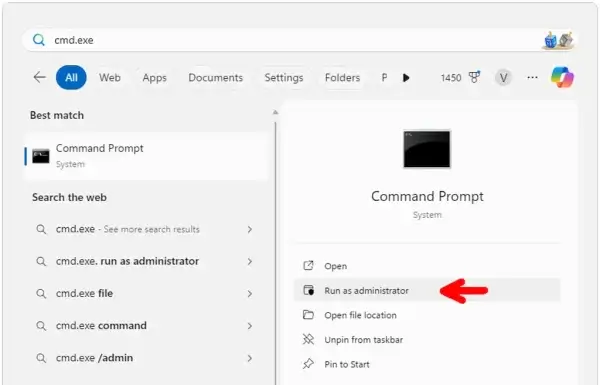
Step 1: Open Command Prompt as Admin
- Press Win + R keys.
- Type cmd.exe, in the run box.
- Then, Press Ctrl + Shift + Enter to Run as Administrator.

Step 2: Check the Disk for Errors
Before converting, it's important to check for and fix any disk errors. Enter the following command in the Command Prompt, replacing X with the actual drive letter of your FAT32 partition:
chkdsk X: /fStep 3: Convert FAT32 to NTFS
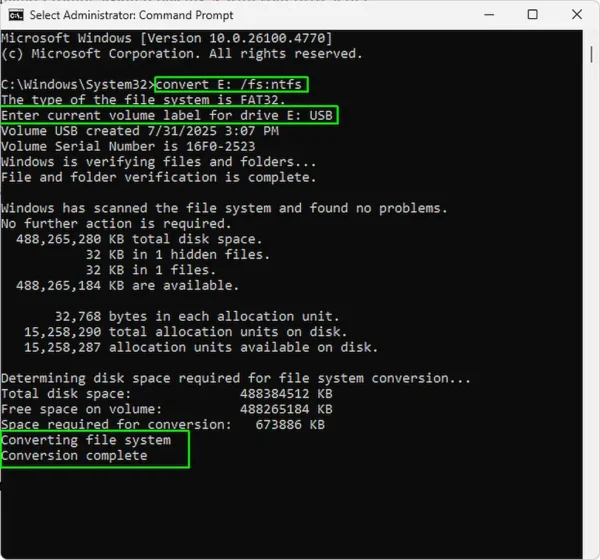
To start the conversion, type the following command in the Command Prompt, again replacing X with your drive letter:
convert X: /fs:ntfsNote: You might also be prompted to enter the Volume Label.
After the conversion process completes, the Command Prompt will display the message: Conversion complete.

Step 4: Verify the Conversion
To confirm the conversion, open File Explorer and check the properties of your drive. It should now display NTFS as the file system.
How to Convert FAT32 to NTFS on Linux
If you are using Linux, you can achieve the same results using tools available on most distributions. Here's how:
Step 1: Install NTFS-3G
Ensure that the ntfs-3g package is installed on your system. This tool allows Linux systems to create and manage NTFS partitions. Install it using your package manager:
sudo apt install ntfs-3g # For Debian/Ubuntusudo yum install ntfs-3g # For CentOS/RedHatStep 2: Backup Your Data
Although Linux tools like mkntfs allow you to format partitions as NTFS, they don't support in-place conversion like on Windows. Instead, you need to:
- Copy all data from the FAT32 drive to another location as a backup.
- Reformat the drive to NTFS.
Step 3: Format the Drive as NTFS
To reformat your FAT32 drive to NTFS, first unmount the drive. Replace /dev/sdX1 with your actual device path:
sudo umount /dev/sdX1Then, use the mkntfs command to format the partition:
sudo mkntfs -f /dev/sdX1This command will format the drive as NTFS. Be careful as this process erases all existing data on the drive.
Step 4: Restore Your Data
Once the drive has been formatted, copy your backup data back to the newly formatted NTFS partition. The drive is now ready for use!
Additional FAT32 Filesystem Conversion Tips
While the conversion process is generally safe, it's always a good idea to back up critical data before proceeding. Additionally, some applications or systems designed specifically for FAT32 may require adjustments or reconfiguration after conversion.
For example, when I tested this method on a YUMI Legacy prepared Multiboot USB flash drive, I needed to rebuild the YUMI syslinux bootloader afterward due to the file system changes. If you're using a similar tool, consult its documentation for guidance.
Frequently Asked Questions (FAQ)
Can I reverse NTFS to FAT32?
No. NTFS to FAT32 conversion is not natively supported.
Reverting from NTFS to FAT32 requires reformatting, which erases all data on the drive.
Always back up your data before reformatting.
What are some alternatives to NTFS?
If you need a file system that works across multiple platforms, consider exFAT.
exFAT supports large files over 4 GB and is compatible with Windows, macOS, and Linux.
It is a strong alternative to NTFS for cross-platform use.
Can I convert FAT32 to NTFS without losing data?
Yes. Windows allows FAT32 to NTFS conversion without data loss using the
convert command.
On Linux, reformatting is required, which erases all data.
Back up important files before starting.
Why would I want to convert from FAT32 to NTFS?
FAT32 has limitations such as a 4 GB maximum file size and an 8 TB partition limit.
NTFS supports larger files, permissions, encryption, journaling, and is more efficient
for larger drives or Windows-focused systems.
Can I use my FAT32 drive after converting it to NTFS?
Yes. After conversion, the drive can be used normally on Windows and Linux
with the NTFS-3G driver.
However, older devices like cameras, game consoles, or legacy systems may not support NTFS.
In those cases, exFAT is a better choice.
What happens to my data during the FAT32 to NTFS conversion in Windows?
The Windows convert command is designed to preserve existing data.
However, any file system operation carries some risk, so backing up your data
before converting is strongly recommended.
How do I format a FAT32 drive to NTFS on Linux?
Linux does not support in-place FAT32 to NTFS conversion.
You must back up your data, then format the drive using tools such as mkntfs.
After formatting, restore your files from the backup.
Is it safe to convert a bootable FAT32 USB drive to NTFS?
Converting a bootable FAT32 USB drive to NTFS can break boot compatibility,
especially for installers and bootloaders.
After conversion, the bootloader may need to be rebuilt.
Always verify boot support before proceeding.
Can I convert FAT32 to NTFS on a Mac?
macOS does not support FAT32 to NTFS conversion.
Third-party tools such as Paragon NTFS for Mac can manage NTFS volumes,
but they do not provide in-place conversion like Windows.
What should I do if I encounter errors while converting FAT32 to NTFS?
Run chkdsk on Windows to check for disk errors and ensure no files are in use.
If errors persist, back up your data and perform a full reformat to NTFS.
Is it possible to convert FAT32 to NTFS on a drive with system files?
Yes, but caution is required.
If the drive contains system or boot files, verify that conversion will not break bootability.
After conversion, you may need to repair or reinstall the bootloader.
Conclusion
Converting from FAT32 to NTFS without losing data is a straightforward process on both Windows and Linux. While Windows allows for in-place conversion, Linux requires reformatting and restoring data. By following the steps outlined in this tutorial, you can unlock the benefits of NTFS while keeping your files intact.
If you found this step-by-step FAT32 to NTFS filesystem conversion guide helpful, you might also be interested in learning how to restore a USB flash drive to factory defaults!
