Let's create a Casper-RW partition larger than 4GB on your USB drive: This tutorial will guide you through the steps to create a writable casper-rw partition larger than 4GB on your USB flash drive. This allows persistent storage beyond the 4GB limit imposed by a casper-rw file, giving you more flexibility for storing files, settings, and configurations on your Ubuntu based Live USB.
Why Use a Casper-RW Partition?
The main advantage of a casper-rw partition over a casper-rw file is the removal of the 4GB size limitation. This is especially useful if you have a large USB drive and want to fully utilize its capacity for persistent storage.
Important: Windows will not recognize this second partition. When viewed in Windows, your USB drive will appear smaller than its actual size due to the hidden casper-rw partition.
This guide assumes you have already created a bootable Live USB with an Ubuntu-based distro (Ubuntu, Xubuntu, Kubuntu, Linux Mint, etc.). This method is not for multiboot USB drives created with Ventoy, YUMI, or UUI. Make sure to delete any existing casper-rw or writable files to free up space before starting.
How to Create a Casper-RW Partition Larger than 4GB
Follow these steps carefully. Make sure to back up any important data on the drive first, as resizing partitions can result in data loss if something goes wrong.
Step 1: Boot from Your Live USB
Restart your computer and boot from your Ubuntu based Live USB. This loads the Live environment needed to manage partitions safely.
Step 2: Launch GParted
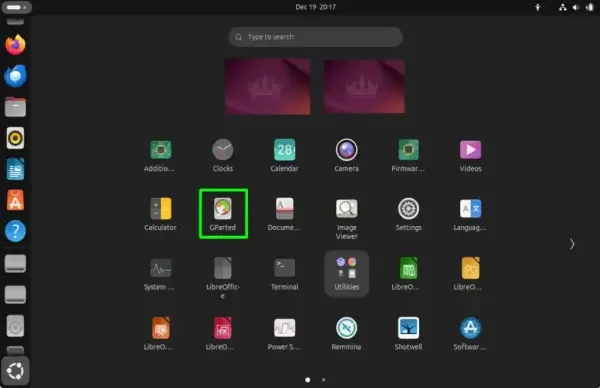
Open GParted from the application menu. GParted is a powerful partition manager that allows you to resize and create partitions easily.

If GParted is not installed, open a terminal and run:
sudo apt-get install gparted
Then launch it by typing:
gparted
Step 3: Select Your USB Drive
In GParted, select your USB drive from the device dropdown menu (usually in the top-right corner). Double-check that you are selecting the correct drive to avoid accidental data loss.
Step 4: Resize the Existing Live OS Partition
Before creating a new casper-rw partition, shrink the existing Live OS partition to free up space:
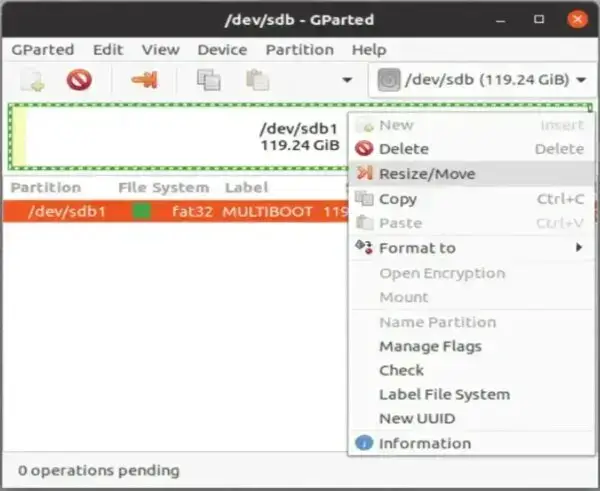
- Right click the partition containing your Live OS (usually green) and select Resize/Move.
- Drag the slider left to reduce the size of the partition, leaving enough unallocated space for the new casper-rw partition. For example, leave at least 8GB if you want a sizable writable partition.
- Click Resize/Move to confirm your selection.

Step 5: Create the New Casper-RW Partition
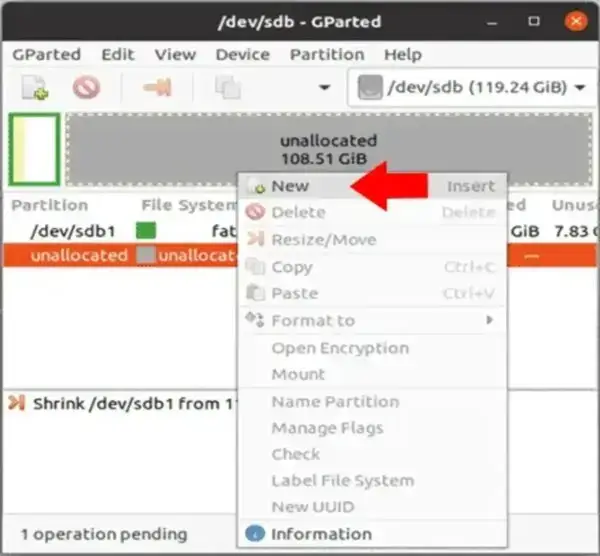
- Right click the unallocated space and select New.
- Set the partition label:
- For Ubuntu/Mint 20+ or later: writable
- For earlier versions: casper-rw
- Select the filesystem type. ext4 is recommended for modern systems, though ext2 or ext3 also work.
- Click Add to create the partition.

Step 6: Apply the Changes
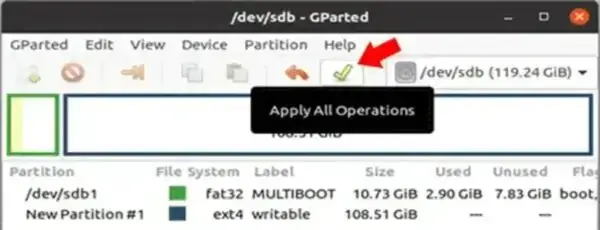
- Click the green checkmark in the toolbar to apply all pending operations.
- Wait for GParted to finish resizing the existing partition and creating the new casper-rw partition. This may take a few minutes depending on the size of your USB drive.

Step 7: Reboot and Verify
Close GParted and reboot your computer from the USB drive. The system should now recognize the second partition as persistent storage, allowing you to save files and configurations across reboots.
Step 8: Enable Persistence on Boot
To ensure the Live USB uses the writable partition, add the following boot parameter:
persistent
This tells the system to store changes on the new casper-rw partition rather than a file.
Final Notes
- Windows will not recognize the second partition, so your USB may appear smaller than it actually is when viewed in Windows.
- This method only works with a single-boot Live USB. Multiboot tools like Ventoy, YUMI, or UUI are not compatible with this procedure.
- Always double-check the selected drive in GParted to prevent data loss.
By following these steps, you now have a larger, fully writable casper-rw partition for your Ubuntu-based Live USB. Enjoy expanded persistent storage and a more flexible Live environment!
Closing Thoughts
Congratulations! You now have a writable casper-rw partition larger than 4GB on your USB drive. This enables extended persistent storage for Ubuntu based Live USBs, beyond the 4GB limitation of file-based persistence.
Reminder: Windows does not recognize the second partition, so your USB may appear smaller in Windows. However, this does not affect usability in Linux.
Enjoy your enhanced persistent storage setup for Ubuntu, Xubuntu, Kubuntu, Linux Mint, or other Ubuntu based Live distributions!
We also have a casper-rw persistent file creator that can be used to create a loopback file from within Windows.
