
Install Grub2 on USB from Windows: Need a reliable way to create a USB stick that boots from both BIOS and UEFI? In this guide we will show you how to install the Grub2 bootloader onto a USB flash drive directly from Windows. Using the grub-install.exe utility, you'll prepare a highly compatible bootable USB device.
Create a GRUB2 BIOS & UEFI Bootable USB Stick
By following these steps, your Grub2 USB bootable USB drive should work on most 32-bit and 64-bit systems. You can also use this method to replace older Syslinux chainloaded Grub2 versions on tools like YUMI UEFI. Though nowadays you should be using YUMI exFAT.
Before proceeding, ensure you have the following:
- A USB flash drive (preferably formatted as FAT32 for maximum compatibility).
- Access to Windows with administrative rights.
- A copy of the grub-2.06-for-windows.zip package or an equivalent Grub for Windows release.
An important note on Grub2 filesystem compatibility:
- Grub2 for BIOS (i386-pc) can be installed on exFAT, NTFS, or FAT/FAT32.
- Grub2 for UEFI (i386-efi / x86_64-efi) must be installed on a FAT/FAT32 partition but can chainload files from other formats like NTFS.
Installing Grub2 on USB from Windows
Here is the simple step by step process of installing Grub2 on USB from Windows:
Step 1: Download and Extract Grub2 for Windows
- Download Grub2 for Windows GNU package.
- Extract the contents of the zip file to your Windows desktop.
- Alternatively, you can download the a1ive Grub2 version for additional features.
You should now see a folder named grub-2.06-for-windows containing grub-install.exe and other related files.

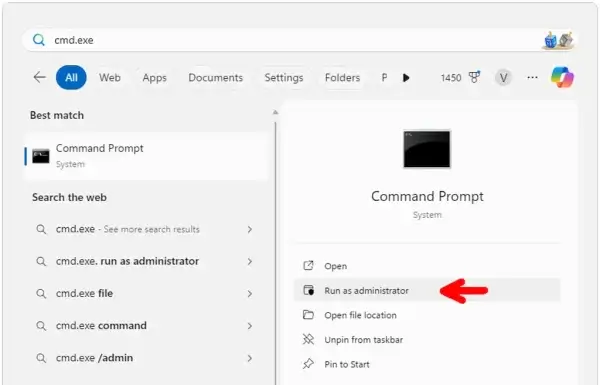
Step 2: Open a Command Prompt
You'll need to use a command line to run grub-install.exe.
- From the Windows ⌕ Type here to search box, type cmd.exe.
- Click Run as administrator.
Step 3: Change to the Grub2 Directory
In the Command Prompt, type the following and press Enter:
cd %UserProfile%Desktopgrub*for-windowsStep 4: Identify USB Drive and Disk Number
Open the Windows Disk Management Tool to determine your USB drive letter and disk number:
diskmgmt.mscFrom the Disk Management Window, make a note of the Disk Number and Volume Drive Letter for your USB device.

Step 5: Install Grub2 for BIOS
In the Command Prompt, type the following command, replacing X with your drive letter and # with your disk number:
grub-install.exe --force --no-floppy --target=i386-pc --boot-directory=X:boot //./PHYSICALDRIVE#Step 6: Install Grub2 for UEFI (32-bit)
Type the following command:
grub-install.exe --force --removable --no-floppy --target=i386-efi --boot-directory=X:boot --efi-directory=X:Step 7: Install Grub2 for UEFI (64-bit)
Finally, type this command:
grub-install.exe --force --removable --no-floppy --target=x86_64-efi --boot-directory=X:boot --efi-directory=X:Step 8: Verify Installation
If all went well, your USB Flash drive should now be bootable with Grub2. It will support BIOS and UEFI across 32-bit and 64-bit systems.

If you used this tutorial on a YUMI-UEFI prepared drive, the Syslinux bootloader should now have been replaced with Grub 2 and you should now be utilizing a Grub USB bootloader, instead.
Troubleshooting GRUB2 USB Issues
If your GRUB2 USB is not working as expected, here are some common problems and solutions:
- GRUB Installation Fails
- Ensure that the USB drive is formatted correctly. Try reformatting to FAT32 and reattempting the installation.
- GRUB Menu Doesn't Appear on Boot
- Make sure the boot mode (BIOS or UEFI) matches your GRUB installation. For UEFI mode, verify that Secure Boot is disabled in BIOS settings.
- grub-install.exe Command Not Found
- Ensure that you are running the command from the correct directory. Use:
cd %UserProfile%Desktopgrub-2.06-for-windows- Boot Error: "Unknown Filesystem"
- If GRUB cannot find the boot partition, check your disk partitioning. UEFI GRUB must be installed on a FAT32 partition.
Customizing the GRUB2 Boot Menu
Once installed, you can configure GRUB2 to improve its functionality.
Editing GRUB2 Configuration
- Navigate to the GRUB configuration file on your USB (where X represents your drive):
X:bootgrubgrub.cfg - Edit it using Notepad++ or another text editor.
- Add custom boot entries, such as a Linux ISO or recovery tools:
menuentry "Boot Linux ISO" {
  set isofile="/boot/linux.iso"
  loopback loop $isofile
  linux (loop)/casper/vmlinuz boot=casper iso-scan/filename=$isofile noeject noprompt splash quiet
  initrd (loop)/casper/initrd
}
Adding a Custom Background
- Place a .png or .jpg image inside the X:bootgrub folder.
- Edit grub.cfg and add:
set background_image=/boot/grub/background.pngAutomate GRUB2 on USB Installation with a Batch Script
For users who frequently install GRUB2, the following Windows batch script can automate the process.
Batch Script for GRUB2 BIOS & UEFI Installation
@echo off
set drive=X:
set disknum=#
cd %UserProfile%Desktopgrub-2.06-for-windows

echo Installing GRUB2 for BIOS...
grub-install.exe --force --no-floppy --target=i386-pc --boot-directory=%drive%boot //./PHYSICALDRIVE%disknum%

echo Installing GRUB2 for UEFI (32-bit)...
grub-install.exe --force --removable --no-floppy --target=i386-efi --boot-directory=%drive%boot --efi-directory=%drive%

echo Installing GRUB2 for UEFI (64-bit)...
grub-install.exe --force --removable --no-floppy --target=x86_64-efi --boot-directory=%drive%boot --efi-directory=%drive%

echo GRUB2 Installation Completed!
pause
How to Use
- Save the above script as
install-grub.bat. - Replace
X:with your USB drive letter. - Replace
#with your disk number. - Run the script as an administrator.
Final Thoughts
Installing GRUB2 on USB drives from Windows is a powerful way to create a bootable device. Whether you're troubleshooting systems, booting into various operating systems, or managing custom tools, this method ensures compatibility with both BIOS and UEFI environments.
However, keep these key points in mind:
- Always double check your disk number and drive letter before running any commands to avoid overwriting the wrong device.
- If you're using this for UEFI, ensure your USB drive is formatted as FAT32 for seamless compatibility.
- If your system fails to boot from the USB, verify your BIOS/UEFI boot settings and disable Secure Boot if necessary.
If you encounter issues, the following resource may help: GNU GRUB Documentation: Official guide to understanding GRUB2 commands and features.
We hope this guide has been helpful in preparing your GRUB2 on USB. For advanced users, experimenting with custom GRUB 2 configurations can further enhance the flexibility of your bootloader setup. Looking for more tutorials?
Check out our guide on creating an exFAT bootable USB.