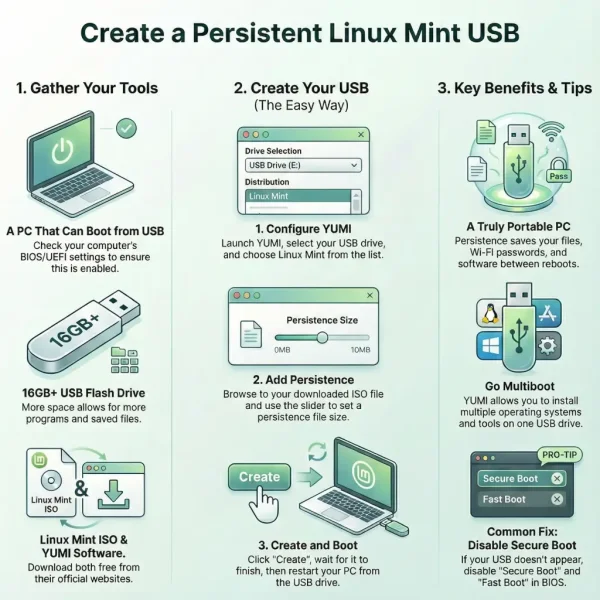
Want to create a USB bootable Linux Mint with persistence? This how to tutorial shows you how to create a Linux Mint Live USB with persistence so you can run Linux Mint directly from a USB drive and save your changes between sessions. You'll also learn how to use that same drive to install Mint to your computer's hard drive.
Below, I'll cover a few ways to make a persistent Linux Mint USB from within Windows, Linux or a macOS: using the YUMI multiboot tool, or the dd command. Let's get started!
Run Linux Mint from a USB with Persistence
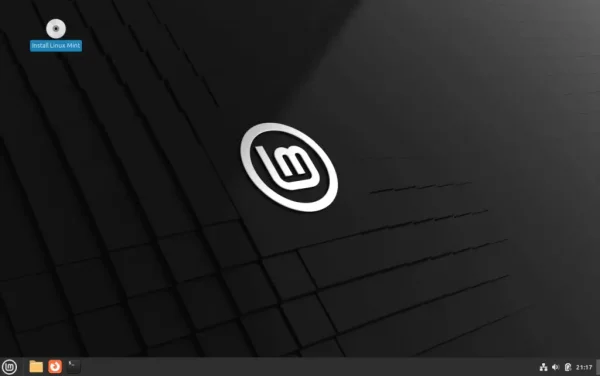
Linux Mint is a popular, beginner friendly Linux desktop operating system based on Ubuntu or Debian. It features multiple desktop environments, a custom software manager, and tools that make it ideal for beginners and experts alike.
Features
- Cinnamon: The flagship desktop with a familiar interface.
- MATE: Lightweight and retro-style for older machines.
- XFCE: Minimalist and fast, ideal for low-spec hardware.
- Debian Edition (LMDE): A rolling release built on Debian.
- Software Manager, Update Manager, Driver Manager: User-friendly tools for daily use.
- Nemo File Manager, Mint Tools, and System Settings: Help customize and manage your system.
- Compatible with Ubuntu and Debian software repositories.
Specifications
- Project Page: linuxmint.com
- Developer: Clement Lefebvre and team
- Initial Release: 2006
- Persistence Support: Yes
- Download: Official ISO Files
What You Need
- A computer that can boot from USB
- Windows 11, 10, 8, or 7
- USB flash drive (16GB+ recommended for persistence)
- Linux Mint ISO file
- YUMI or Windows Subsystem for Linux (WSL)
Verify Your ISO File (Recommended)
After downloading the Linux Mint ISO, you can verify its integrity by checking the SHA256 checksum. You can use the following command from an open terminal to do so:
sha256sum linuxmint-21.3-cinnamon-64bit.isoCompare the result with the official hashes listed on the Linux Mint verification page.
How to Create a Persistent Linux Mint Bootable USB
Here are a few different methods one could use to create a Linux Mint bootable USB with Persistence:
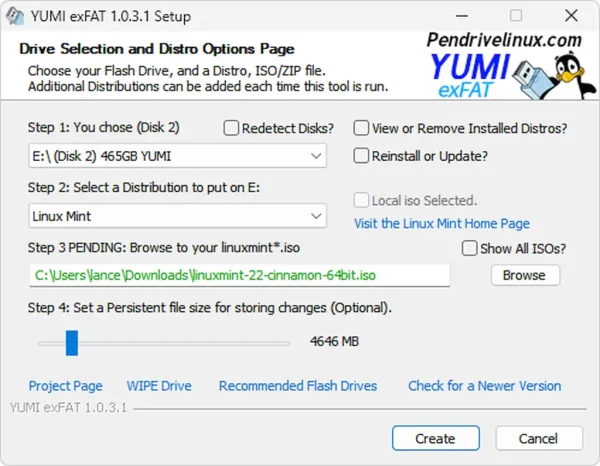
Method 1: Using YUMI (Your Universal Multiboot Installer)
- Download and launch YUMI.
- Select your USB flash drive.
- Choose Linux Mint from the list. Browse to your downloaded ISO.
- Set a persistence file size (optional).
- Click Create.
- Once finished:
- Reboot your computer
- Enter BIOS/UEFI and set USB as the first boot device
- Save and exit, then boot from the USB
- Once the YUMI boot menu appears, select Linux ISOS -> Linux Mint to boot the ISO from USB
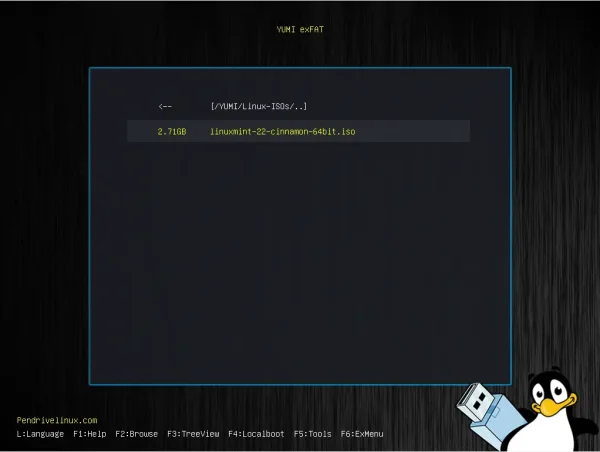
Pro Tip: YUMI allows you to create a multiboot USB with multiple Linux distros, utilities, and even Windows installers, all on one drive.
Method 2: Using dd in Windows Subsystem for Linux (WSL)
- Install WSL:
wsl --install - Open WSL terminal and identify your USB:
lsblk - Unmount the USB (if mounted):
sudo umount /dev/sdX - Write the ISO:
sudo dd if=/path/to/linuxmint.iso of=/dev/sdX bs=4M status=progress - Sync and safely eject:
sync - Create a persistence overlay:
mkdir /mnt/usbsudo mount /dev/sdX1 /mnt/usbsudo dd if=/dev/zero of=/mnt/usb/persistence.img bs=1M count=4096sudo mkfs.ext4 /mnt/usb/persistence.imgsudo mv /mnt/usb/persistence.img /mnt/usb/casper-rw- (Optional):
sudo e2label /mnt/usb/casper-rw casper-rw sudo umount /mnt/usb
- When booting, add
persistentto the boot parameters.
Method 3: Create Linux Mint USB with Persistence on macOS or Linux
- Insert USB drive (16GB+ recommended) and identify its path:
sudo fdisk -l - Format USB (optional but recommended):
sudo mkfs.vfat /dev/sdX - Write ISO to USB using
dd:sudo dd if=linuxmint.iso of=/dev/sdX bs=4M status=progressReplace
/dev/sdXwith your actual USB device. - Create persistence file:
sudo mkdir /mnt/usb sudo mount /dev/sdX1 /mnt/usb cd /mnt/usb sudo dd if=/dev/zero of=casper-rw bs=1M count=4096 sudo mkfs.ext4 casper-rw sudo umount /mnt/usb - Enable persistence on boot:
When booting, pressTabat the boot menu and addpersistentto the kernel parameters.
Troubleshooting Tips for USB Boot Issues
- USB not showing in boot menu? Disable Secure Boot and Fast Boot in BIOS/UEFI settings.
- Linux Mint won't boot? Try recreating the USB with a different tool like Etcher. Verify your ISO download using checksums.
- Persistence isn't working? Double-check that you enabled persistence during setup, and select the correct boot entry (persistent/live) if prompted.
Installing Linux Mint from USB
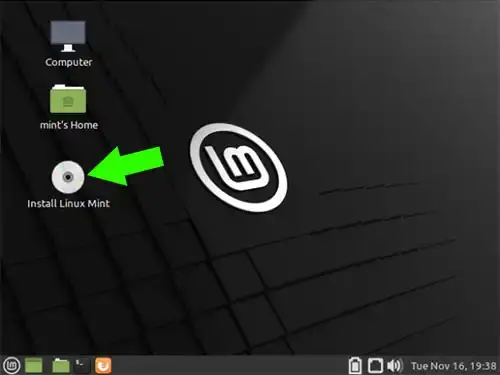
Proceed to boot Linux Mint from USB ~ Once booted into the live environment, double click the "Install Linux Mint" icon on the desktop. Follow the installation prompts to install it to your internal hard drive or another external device.
Security Tip for Persistent USBs
Because persistence stores your personal data, treat your USB drive like a portable PC. You can encrypt sensitive files or use full drive encryption (like LUKS) for additional security.
Frequently Asked Questions
How do I install Linux Mint from a USB with persistence?
Boot into Linux Mint from the USB, then click the "Install Linux Mint" desktop icon. Follow the steps to install to your internal drive or another USB.
How do I create a Linux Mint Live USB with persistence on macOS or Linux?
Use the dd command to write the ISO to the USB, then create a casper-rw persistence file. Full instructions are in the macOS/Linux section above.
Which tool is best for making a persistent Linux USB?
YUMI is one of the easiest tools for persistent Linux Mint USBs. Rufus and Ventoy are alternatives, but may require extra setup.
Can I run Linux Mint entirely from a USB stick?
Yes. With persistence, you can boot Linux Mint from a USB stick, save files and settings, and use it like a portable PC.
What data does a persistent Linux USB save?
Persistent USBs retain bookmarks, Wi-Fi passwords, downloaded files, application settings, and installed software between reboots.
What is YUMI and why use it?
YUMI is a multiboot USB creator for Windows that supports persistence. It's easy to use and supports multiple ISOs on a single drive.
Can I upgrade Linux Mint on a persistent USB?
You can install packages and updates, but full version upgrades are not recommended. Consider a full installation on a dedicated partition instead.
What size USB drive do I need for Linux Mint with persistence?
16GB is the minimum recommended. For a smoother experience and more storage, use 32GB or larger.
Can I use Rufus or Ventoy for persistence with Linux Mint?
YUMI supports Linux Mint persistence out of the box. Rufus has limited persistence support, and Ventoy may require manual setup.
Is persistence safe on a USB?
Yes, but repeated writes can wear down flash memory. Use higher end SSD based USB flash drives for long term reliability.
Final Thoughts on Making a Linux Mint USB
Creating a USB bootable Linux Mint with persistence is a powerful way to have a portable, full featured Linux system anywhere. Whether you use it for testing, recovery, or daily tasks, a persistent USB gives you flexibility without altering your main OS.
Follow the steps above to build your own Linux Mint USB and carry your customized Linux environment in your pocket. It's a fantastic tool for beginners, developers, or sysadmins alike.
