
In the following tutorial, I cover how to create a Parted Magic bootable USB flash drive from within Windows. This fully functional portable Operating System doubles as a disk management utility to help you perform disk editing, disk imaging, and partitioning tasks with ease.
Parted Magic Booting from USB

About Parted Magic
Parted Magic is a commercial Linux based live USB distribution originally based on Slackware. Developed by Patrick Verner, it was designed for partitioning, cloning, backup, and recovery of hard drives and other storage devices.
The software includes several disk management tools, such as GParted, Parted, Clonezilla, TestDisk, and other utilities. These tools allow users to perform a variety of tasks, such as resizing, copying, moving, and deleting partitions, as well as creating disk images and restoring data from backups.
It is widely used by IT professionals, system administrators, and home users who need a reliable and powerful disk management solution. It is available for purchase on the authors website, and it can also be downloaded and used for free as a trial version with limited functionality. Features include:
- Supported Storage Devices: Hard disk drives (SATA, IDE, SCSI). Flash memory, USB drives, SSD (Solid State Drives). Devices with sector sizes of 512, 1024, 2048, 4096, etc.
- Fully Supported File Systems: ext2, ext3, ext4, fat16, fat32, ntfs, reiserfs, btrfs, exfat, hfs, hfs+, f2fs
- Partial File System Support: jfs, Linux swap, lvm2 pv, nilfs, reiser4, ufs, xfs, zfs
- Possible File System Actions: Create, Grow, Shrink, Move, Copy, Check, Label, UUID
- Supported Hardware: Requires at least a 64-bit processor. 8GB of RAM (2GB in Live mode).
- Specific OS/Hardware Support: Compatible with Secure Boot mode commonly found on Microsoft Windows based machines. Can run on Intel Mac hardware as well.
- Networking: Uses Network Manager for setting up wired and wireless connections. Includes Firefox for internet browsing
- Additional Partition Features: Supports msdos or gpt partition tables. Supports MIB partition alignment or traditional cylinder boundaries. Allows disabling and enabling partition flags such as hidden, boot, raid, etc.
- No Installation Required: PartedMagic is a standalone Linux operating system. It'll run from a USB drive. No installation to PC is required.
- Disk Partitioning Software: This portable disk partition utility is equipped with tools for easy disk partitioning, allowing users to effortlessly create, resize, move, and manage partitions on their hard drives.
- SSD Secure Erase: Parted Magic supports securely erasing SSDs, marking all cells as empty.
- Benchmarking Software: Parted Magic includes benchmarking software for testing the relative performance of a computer by running standard tests and trials.
- Includes other useful hard disk management tools: Such as partition image, testdisk, fdisk, sfdisk, dd, and ddrescue.
Specifications
- Distribution Home Page: Official Site
- Developer: Patrick Verner
- Minimum Flash Drive Capacity: 2 GB
- Persistent Feature: No
Checklist
- Windows PC to perform the install
- i586 processor and 256 MB of RAM to operate or at least 128 MB in "Live" mode
- Fast USB flash drive
- pmagic.iso
- YUMI or UUI (to automatically make the bootable USB) or dd for Windows to do so manually.
Make a Parted Magic Bootable USB using YUMI
To automate the process of making a Parted Magic Bootable USB, you can use YUMI. Here's how:
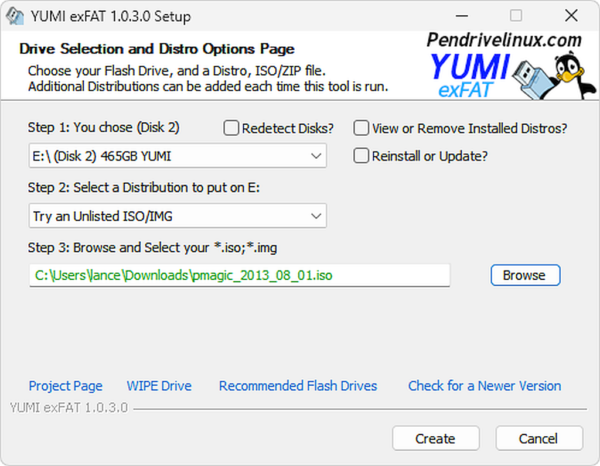
- Download YUMI and launch the Multiboot bootable USB creation tool.
- (1.) Select your flash drive from the list of devices (Select the box to prepare your drive for YUMI. Note, this will wipe and format your drive.)
(2.) Then choose Try Unlisted ISO/IMG from the list of distros.
(3.) Browse to and select your pmagic.iso file, and then click Create.
- Once the YUMI Multiboot USB Boot maker has finished:
(1.) Reboot your PC and enter BIOS Hotkey during system post.
(2.) Set your BIOS/UEFI Boot menu to boot from your USB drive.
(3.) Proceed to start your computer running from the USB pen drive.
(4.) Select Parted Magic from the YUMI boot menu when prompted.
Create a Bootable USB for Parted Magic Using dd
Advanced users can create a bootable Parted Magic USB on Windows using the dd command. This method writes the ISO directly to the USB device and should be used with care. Selecting the wrong device will permanently erase data.
Requirements
Save both files to a convenient location on your system, such as C:\dd.
Using dd on Windows
- Open Command Prompt as Administrator
Press Win + R, typecmd, then press Ctrl + Shift + Enter. - Change to the folder containing dd.exe
cd c:\path-to-dd.exe - Prepare the USB drive using diskpart
From the administrator command prompt, launch diskpart (Windows disk partitioning tool).diskpartThen, list all disks on the system;
list diskSelect your USB disk (replacing # with the disk number of your USB drive);
select disk #Then, wipe the drive clean;
(warning this erases everything on the entire disk: all partitions on the disk)cleanFinally, exit diskpart;
exit - Write the ISO to the USB drive
Immediately after runningclean, write the ISO to the USB drive. Replacingpath-to-pmagic.isoand#with your USB disk number.dd if=pmagic.iso of=\\.\PhysicalDrive# bs=4M --progress
Important notes:
- Always run Command Prompt as Administrator
- Do not open Disk Management after running
diskpart clean - Do not format the USB drive with another tool or open it while running the commands.
- Let
ddbe the first tool to write to the disk - The USB drive may briefly appear as unformatted, which is expected
Once the write process completes, safely eject the USB drive using the Windows "Safely Remove Hardware" option.
Reboot your system, select the USB drive from your BIOS or UEFI boot menu, and Parted Magic should start.
Make a Parted Magic Live USB from Linux
To manually create a Parted Magic bootable USB from Linux (Ubuntu was used here), you can use the following steps:
- Download Parted Magic ISO and move it to your Desktop.
- Insert a USB flash drive into your computer.
- Open a terminal (Ctrl + Alt + T)
- To find your USB device, type the following and press enter.
sudo fdisk -l
Make note of which device belongs to your USB drive. For example /dev/sdX.
- Type the following command to change your current directory to Desktop.
cd Desktop
- Type the following command replacing X with your actual USB device letter from step 4.
sudo dd if=parted*.iso of=/dev/sdX status=progress
- Reboot your PC and set your UEFI/BIOS or Boot Menu to boot from your USB drive and proceed to boot.
Congratulations! If everything went smoothly, you now have your very own Parted Magic bootable USB flash drive. This versatile USB partition tool is designed to run on any PC that supports UEFI/BIOS booting from an external USB device. Whether you're cloning drives, resizing or moving partitions, or backing up and recovering data, your portable partitioning software should now be ready whenever you need it.
Summary and Alternatives to Parted Magic
Parted Magic is a powerful and versatile USB partition tool, ideal for a wide range of disk management tasks. However, if you're looking for a free and open source alternative, creating a GParted Live USB might be worth considering. Both tools are highly effective, but cater to slightly different needs. Here's a quick comparison to help you decide which is right for you:
| Feature | Parted Magic | GParted |
|---|---|---|
| Cost | Paid (One time fee) | Free (Open Source) |
| Included Utilities | Includes a full suite of tools for disk cloning, data recovery, secure erasing, benchmarking, and partition management | Focused solely on partition management (create, resize, move, format, delete partitions) |
| Data Recovery Features | Built in tools for recovering lost files and partitions | No data recovery features |
| Secure Erase | Includes secure erase and wiping tools for drives | Does not include secure erase functionality |
| Performance Optimization | Includes tools like disk benchmarking and SSD trimming | No specific tools for performance optimization |
| Ease of Setup | Requires purchase and download of ISO; includes pre-configured utilities | Free ISO download; No fluff with fewer utilities to set up |
| Support | Active support community and documentation; paid support available | Community support through forums and limited documentation |
While Parted Magic provides a complete toolkit for professionals and advanced users, GParted offers a straightforward, no cost option for basic essential partitioning needs.