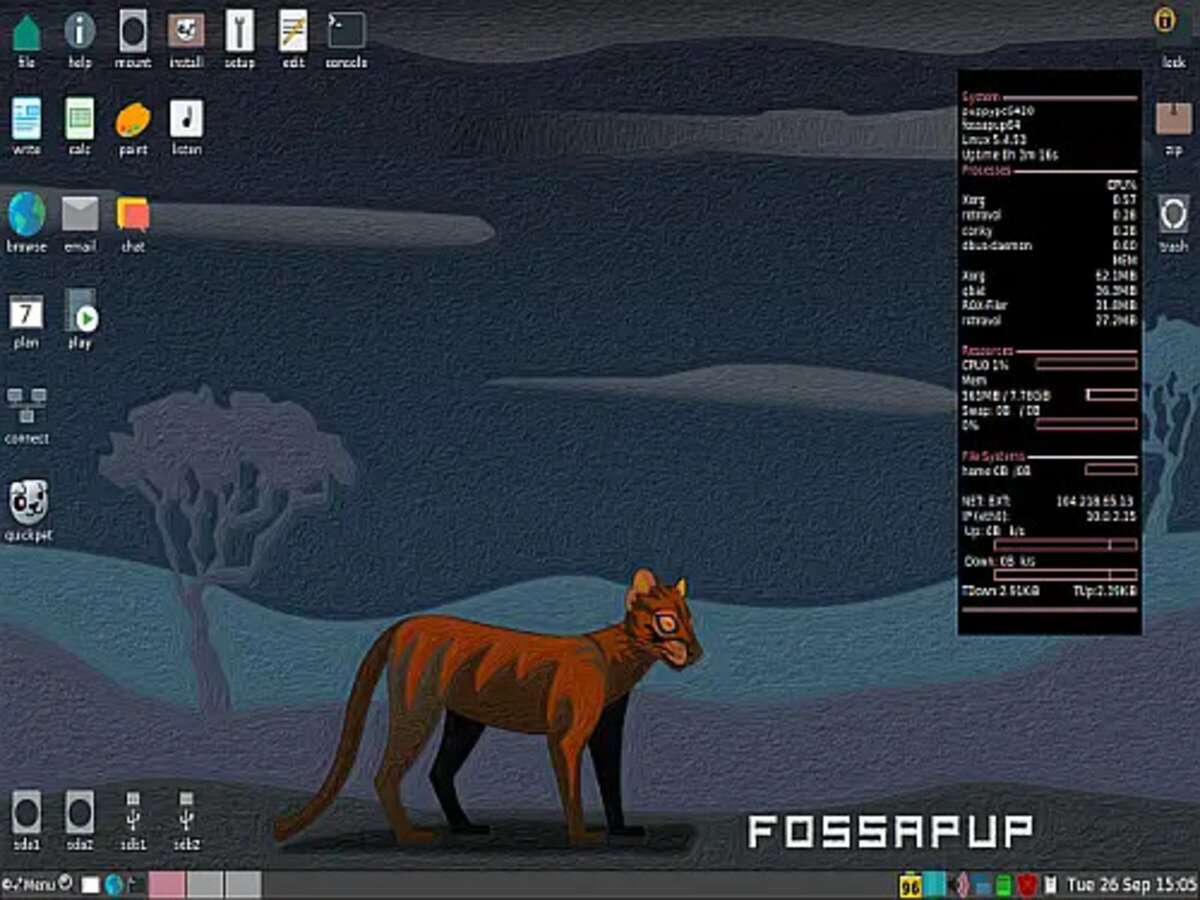
Create a Puppy Linux Live USB from Windows, Linux, or MacOS. In the following section, I will show you several methods to install, boot, and run a Live Puppy Linux system from a bootable USB flash drive. You can use the Universal USB Installer (UUI) from within Windows or the dd command from Linux or MacOS. Although packed with popular features, this Live Linux distribution aims to remain lightweight and small, allowing it to run exceptionally well on older computer hardware.
Puppy Linux Live Running from USB

Puppy Linux is a popular lightweight, open-source distribution designed to be fast, efficient, and easy to use. It was originally created by Barry Kauler in 2003 and has since gained a dedicated user base, spawning many different spinoffs due to its unique characteristics and versatility. Key features of this Live Linux distribution include:
- Lightweight Linux Distro: Known for its small footprint and minimal system resource requirements. It can run smoothly on older hardware with limited RAM and storage, making it an excellent choice for revitalizing aging computers or systems with minimal resources.
- Live Linux Distribution: Puppy Linux is distributed as a bootable ISO image, allowing you to boot your computer directly from the ISO without needing to install it on your hard drive. This makes it extremely handy for use on the go.
- Persistence Feature: Certain versions support persistence, enabling you to save some of your settings, files, and configurations while running from USB.
- User-Friendly GUI - GDE: The distribution emphasizes user-friendliness and accessibility for all skill levels. Most builds feature intuitive and easy-to-learn graphical desktop environments such as JWM or IceWM.
- Simple Package Management: Puppy uses its own package management system called "PET packages" via the Puppy Package Manager. While it uses its native format, it is also compatible with Debian (.deb) and Slackware (.tgz) packages, greatly expanding its software availability.
- Build Your Own Puppy: Highly customizable, Puppy allows users to create their own variants known as "Puppy builds" or "Puppy derivatives," tailored to specific needs. This flexibility makes it a popular choice for embedded systems and specialized use cases.
- Puplets: Puppy Linux offers various "puplets," or customized versions designed for different purposes, such as Puppy Arcade for gaming, Puppy Slacko based on Slackware, and many more. These puplets come preloaded with specific software and configurations tailored for their intended uses.
Overall, booting from a Puppy Linux USB is ideal for users seeking a lightweight, portable, and customizable Linux distribution that works well on older hardware.
Puppy Linux Detailed Specifications
- Distribution Home Page: Puppy Linux Project
- Developer: Barry Kauler
- Original Release Date: First released in 2003
- Main Distribution Status: Yes (with many spinoffs and remixes based on it)
- Persistence Feature: Yes
Basic Essentials to Create a Puppy Linux USB
- Windows 11, 10, 8, 7, XP, MacOS, or Linux
- *puppy*.iso file
- USB flash drive (for best performance, use a fast SSD thumb drive).
- Universal USB Installer (USB Boot Maker), dd.exe, or the dd command from Linux or MacOS.
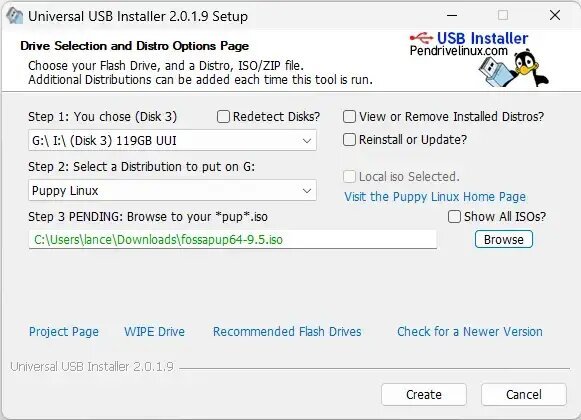
Create a Puppy Linux Live USB using UUI
- Download and run the Universal USB Boot Maker.
- (1) Select your USB drive from the drop-down list.
(2) Choose "Puppy Linux" as the distribution.
(3) Browse to your *pup* ISO file and click Create.

Make a Puppy Linux Bootable USB using DD on Windows
You can use the following steps to create a bootable Puppy USB drive with dd on Windows:
Note: Use caution with dd as it will destroy all data on the selected drive. Double-check that you are writing to the correct USB drive before executing the dd command.
- First, download a Puppy ISO from the official website. Ensure you select the correct version (32-bit or 64-bit) for your system.
- Insert your USB drive into the computer, ensuring it has enough capacity to hold the ISO file.
- Open Command Prompt with administrative privileges (right-click and select "Run as administrator") and type:
diskpart - To list all attached disks, type:
list diskIdentify the disk number corresponding to your USB drive. Confirm this using File Explorer or the Disk Management tool (diskmgmt.msc) before proceeding.
- Clean and unmount the USB drive by typing:
select disk XReplace X with your USB drive’s disk number.
- Then run:
clean - Download dd for Windows and launch it.
- Write the Puppy ISO to your USB drive using the dd command:
dd.exe if=path\to\*pup*.iso of=\\.\PhysicalDriveX bs=4MExplanation of parameters:
if=path\to\*pup*.iso: Path to the ISO file on your computer. Modify this to your actual ISO location.
of=\\.\PhysicalDriveX: Replace X with your USB drive number.
bs=4M: Block size set to 4 MB; increase this value to speed up writing if desired. - When the write completes, safely eject your USB drive.
Making a Puppy Linux USB from Linux
To create a bootable Puppy Linux USB from Linux (Ubuntu used here), follow these steps:
- Download Puppy ISO and move it to your Desktop.
- Insert a USB drive into your PC.
- Open a terminal (Ctrl + Alt + T).
- Identify your USB device with:
sudo fdisk -l
Note the device name assigned to your USB (e.g., /dev/sdX).
- Navigate to Desktop:
cd Desktop
- Note: The
ddcommand overwrites data and must be used carefully. Double-check the USB path before proceeding.
Run:sudo dd if=*pup*.iso of=/dev/sdX status=progress
- Reboot your PC, access your UEFI/BIOS or Boot Menu, and select your USB drive to boot Puppy Linux.
Create a Puppy Linux Live USB from macOS
For macOS users, the process is slightly different. Here’s how to create a bootable Puppy Linux USB using Terminal:
- Download the desired Puppy ISO.
- Insert a USB drive into your Mac. Ensure it has enough space and back up any data as this process will erase the drive.
- Open Terminal (Command + Space, type
Terminal, then hit Enter). - List disks with:
diskutil listIdentify your USB drive (e.g.,
/dev/disk2) by verifying size and partitions. - Unmount the USB drive:
diskutil unmountDisk /dev/diskXReplace
Xwith the disk number. - Use dd to write the ISO:
Note: This will overwrite the drive. Double-check the device path.sudo dd if=/path/to/*pup*.iso of=/dev/diskX bs=4mParameters explained:
- if= input file (path to ISO)
- of= output device (your USB drive)
- bs=4m block size (4 MB for efficient writing)
You will likely be prompted for your password.
- Wait for completion (may take several minutes), then eject the USB:
diskutil eject /dev/diskX - Reboot your Mac, hold Option (⌥) at startup, and select the USB drive to boot Puppy Linux.
Booting from USB Puppy Linux
- During startup, at the POST screen, use your motherboard's hotkey to enter BIOS.
- Use the arrow keys to set your USB drive as the first boot device.
- Save changes (typically F10) and reboot the system to boot from the USB flash drive.
If all went well, you should boot into your Puppy Linux USB created with UUI. You may be prompted to create a persistent file for saving session data on shutdown—be sure to select your USB drive for this.
Note: You can also use your Puppy Linux Live USB to install the operating system onto a local hard drive if desired.
Frequently Asked Questions (FAQ)
Can I run Puppy Linux entirely from the USB without installing it?
Yes! Puppy Linux is designed to run as a Live system directly from the USB drive. This means you don’t have to install anything on your hard drive to use it.
Will Puppy Linux save my files and settings when running from USB?
Many Puppy Linux versions support persistence, allowing you to save files, settings, and installed applications between sessions. When you first boot Puppy Linux, you may be prompted to create a persistent save file or folder on your USB.
Can Puppy Linux run on very old computers?
Absolutely. Puppy Linux is known for its lightweight design and minimal hardware requirements, making it ideal for older computers with limited RAM and storage.
How do I boot Puppy Linux from USB if my computer doesn’t start from it automatically?
You need to enter your computer’s BIOS or UEFI settings during startup and change the boot order to prioritize the USB drive. Typically, pressing keys like F2, F12, ESC, or DEL during boot will open the BIOS or boot menu.
Is it safe to use the dd command to create a Puppy Linux USB?
Yes, but caution is needed. The dd command overwrites the entire target drive and can erase data irreversibly if you select the wrong drive. Always double-check your device path before running the command.
Can I install Puppy Linux permanently on my hard drive?
Yes, a Puppy Linux USB includes an installer that lets you install it to your hard drive if you decide you want a permanent setup instead of running it live from USB.
Can I run Puppy Linux alongside other operating systems?
Yes, you can use Puppy as a live system without affecting your existing operating systems. If you choose to install Puppy, consider setting up a dual boot configuration.
What flash drive should I use for a Puppy Linux USB?
While any USB flash drive will work to create a Puppy Linux Live USB, it’s best to use a fast USB 3.0 or SSD-based flash drive to improve performance and reduce boot times.
Final Thoughts on Creating a Puppy Linux Bootable USB
By following these step by step instructions, you can easily create a lightweight, bootable Puppy Linux Live USB on Windows, Linux, or macOS. Whether you’re looking to revive old hardware, run a portable Linux system, or explore Puppy Linux on the go, a Puppy Linux bootable USB offers a fast, flexible, and highly customizable tiny Linux distribution solution that runs smoothly even on low resource computers.
