
Learn how to create a bootable USB for Simply MEPIS Linux using YUMI (Windows), dd (Linux/Windows), or Terminal on macOS. Simply MEPIS was originally developed by Warren Woodford in 2002 as a user-friendly Debian-based Linux distribution.
Boot Simply MEPIS from USB
As the name suggests, Simply MEPIS is known for its ease of use and simple out of the box functionality. Although discontinued, it remains lightweight and suitable for older PCs or testing environments.
Key Features
- Base: Debian GNU/Linux
- Interface: KDE Desktop
- First Release: May 2003
- Persistence Support: Not available
- Status: Discontinued (mepis.org)
MEPIS supports Live USB/CD/DVD booting and includes drivers and applications for general use without installation.
Requirements
- USB flash drive (2GB+)
- PC or Mac running Windows, Linux, or macOS
- Simply MEPIS ISO image
- Tool: YUMI, dd, or macOS Terminal
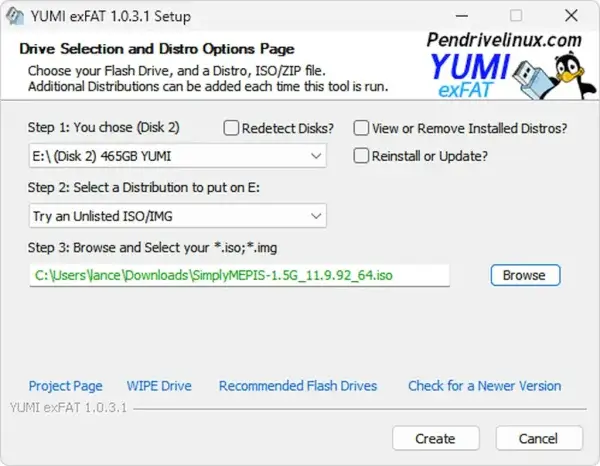
Method 1: Create MEPIS Bootable USB with YUMI (Windows)
- Download the Simply MEPIS ISO.
- Download and run YUMI (exFAT recommended).
- Select your USB drive in YUMI.
- Choose "Try Unlisted ISO/IMG".
- Browse to the ISO file and click Create.
Method 2: Write ISO with dd (Linux or Windows)
Warning: This will erase all data on the USB drive. Back up important files first.
- Download the ISO file.
- Insert your USB drive and identify its device name:
lsblk- Write the ISO to USB on Linux:
sudo dd if=SimplyMEPIS.iso of=/dev/sdX bs=4M status=progressReplace
sdXwith your USB device name. - On Windows (using dd for Windows):
dd if=SimplyMEPIS.iso of=\\?\Device\HarddiskVolumeX bs=4M --progress
Method 3: Create a Simply MEPIS USB on macOS
Warning: This will erase all data on the selected USB drive. Back up important files first.
- Download the Simply MEPIS ISO to your Mac.
- Insert your USB drive (2GB+ recommended).
- Open Terminal and list drives:
diskutil list - Identify the USB drive (e.g.,
/dev/disk2) and unmount it:diskutil unmountDisk /dev/disk2 - Write the ISO to USB:
sudo dd if=~/Downloads/SimplyMEPIS.iso of=/dev/rdiskX bs=4mReplace
Xwith your USB disk number. - Wait for completion, then eject:
diskutil eject /dev/diskX
Booting from Simply MEPIS USB
- Restart your computer and enter BIOS/UEFI (usually F2, Del, or Esc).
- Select your USB drive as the boot device.
- Boot into the Live Simply MEPIS environment.
MEPIS Default Logins
- User: demo, Password: demo
- User: root, Password: root
FAQs
What is Simply MEPIS?
A lightweight or tiny discontinued Debian based Linux distribution known for its simplicity and KDE desktop.
What operating systems can I use to make the bootable USB?
You can use Windows (YUMI or dd), Linux (dd), or macOS (Terminal with dd).
Is persistence supported?
No. Simply MEPIS does not support persistent sessions on USB.
Is installation required to run it?
No. You can boot into the Live desktop environment without installing to a hard drive.
Final Thoughts
Creating a bootable USB for Simply MEPIS Linux is straightforward using YUMI on Windows, dd on Linux, or Terminal on macOS. While this particular Linux distro was discontinued, it remains a fun lightweight, easy to use Debian based distribution ideal for testing, troubleshooting, or running older hardware. Remember that persistence is not supported, so changes won't be saved between sessions. By following the steps above, you can quickly boot into a Live environment without installing anything on your hard drive, making it a safe and flexible option for experimenting with Linux.