How to make Clonezilla USB bootable flash drive from Windows. Clonezilla software is a free partition or disk clone tool that works similar to Norton Ghost and Partition Image. It can be used to backup (clone) information from media to media.
Clonezilla USB Boot

Clonezilla Live Features
This USB bootable software is a free and open source all in one disk cloning, disk imaging, and backup solution. It is designed to help users create and deploy exact copies, or clones, of entire hard drives, partitions, or individual files. A Clonezilla Live USB can be useful in situations where you need to duplicate or clone (copy bit for bit) the contents of one disk or partition onto another such as when upgrading to a new hard drive, or for creating backups.

This disk cloning tool supports remote or local backups to and from an entire disk, image or a partition. Additionally, the drive cloner can be used to restore remote or locally cloned backups. Clonezilla saves and restores only used blocks in the disk, making it very efficient.
Its features include:
- Disk Cloning: Can be used create a clone of an entire disk or individual partitions. This process involves copying the data bit by bit, making it suitable for replicating the entire operating system and all data on a disk.
- Disk Imaging: It allows you to create disk images, which are compressed and stored as files.
- Backup and Restore a System: Backup your entire operating system, installed software, and user data. In case of a system failure, you can restore the entire system from the backup image. Essentially recreating the original state of the disk or partition when the image was created.
- Cloning from a Bootable USB: You don't need to install it on your running operating system; you can boot directly from a Clonezilla Live USB to perform all cloning or imaging operations.
- Multiple File System Support: It supports various file systems, including NTFS, FAT, ext2, ext3, ext4, ReiserFS, xfs, jfs of GNU/Linux, FAT, NTFS of MS Windows, and HFS+ of Mac OS. Making it compatible with a wide range of operating systems.
- Includes Partition Resizing Options: Enables you to resize partitions during the cloning or restoration process, which can be handy when migrating to a larger or smaller disk.
- Command-Line and User Interface Versions: The software offers both a command line interface (CLI) version for advanced users and a beginner friendly graphical user interface (GUI) version.
- Multiplatform Cloning: It is compatible with both Linux and Windows systems. You can use it to clone and backup both Linux and Windows installations.
- It's Free and Open Source: It is distributed under the GNU General Public License (GPL), which means it is free to use, modify, and distribute.
This is a very useful and powerful tool for system administrators, IT professionals, and advanced users who need to manage disk cloning, imaging, and backup tasks efficiently. It provides a reliable and straightforward way to safeguard data and perform system migrations.
- Distribution Home Page: Project Page
- Developer: Developed by Steven Shiau
- Release Date: The first release was on October 4, 2004
- Persistent Feature: Yes
How to Make Clonezilla USB Bootable
From Windows using YUMI
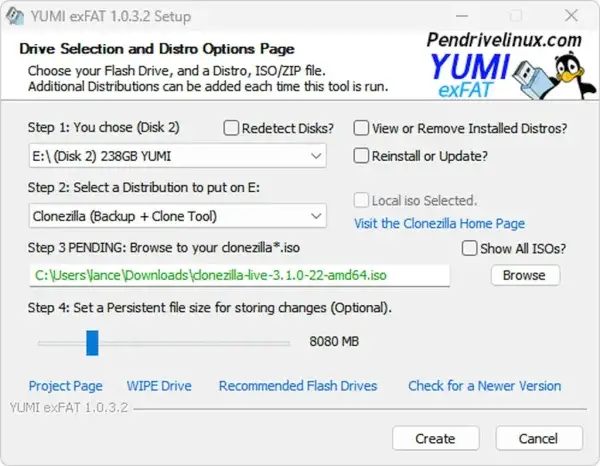
To make Clonezilla USB bootable flash drive from Windows using YUMI, follow these steps:
- First grab an ISO file. Clonezilla Download
- Download and launch the YUMI USB Boot Maker.
- (1) Choose your Flash Drive (Disk #) from the drop down list.
(2) Then select Clonezilla (Backup + Clone Tool) from the list.
(3) Browse to your ISO file, and then click Create.
Step to make Clonezilla USB Bootable using YUMI - Once the YUMI script has finished, restart your PC and set your BIOS or Boot Menu to boot from the USB device. Save your changes and then reboot.
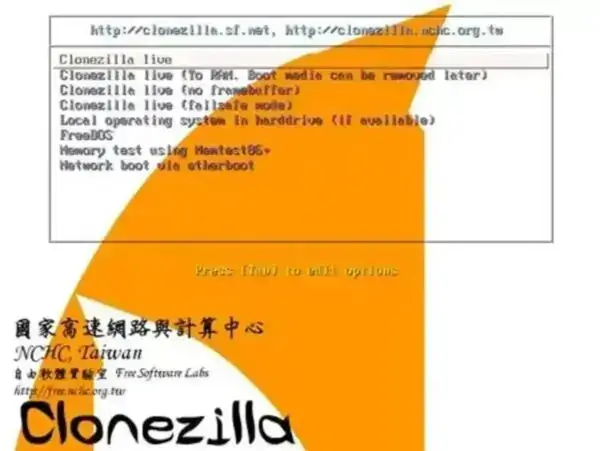
If all went smoothly, you should be presented with a YUMI Boot Menu option that you can now select to Boot from your Live Clonezilla USB flash drive. Note that some variants also allow for Clonezilla Persistence and though it isn't pictured here, the newer version of YUMI supports this.
From Linux Using dd
To create a Clonezilla USB bootable flash drive in Linux:
- Download the Clonezilla ISO file.
- Plug in a USB drive (minimum 1GB) and identify its device name (e.g.,
/dev/sdX).lsblkReplace
sdXwith the correct device name of your USB drive. - Ensure the USB drive is unmounted:
sudo umount /dev/sdX* - Write the ISO to the USB drive using
dd:sudo dd if=/path/to/clonezilla.iso of=/dev/sdX bs=4M status=progress && syncReplace
/path/to/clonezilla.isowith the full path to the downloaded ISO file. - Once complete, reboot your PC, configure your BIOS/UEFI to boot from USB, and use the Clonezilla Live environment.
Frequently Asked Questions (FAQ)
Here are some commonly asked questions regarding this popular hard drive cloning and backup tool.
What is Clonezilla used for?
It is primarily used for disk cloning, imaging, and backup. It is ideal for duplicating drives, restoring systems after crashes, or migrating to new storage devices.
Does Clonezilla work with SSDs?
Yes, it supports SSDs and can clone, image, or restore data on SSDs without issues.
Can I use Clonezilla on a Mac?
Yes, it supports HFS+ file systems. However, you must boot from a PC-compatible Mac.
What file systems are supported?
It supports NTFS, FAT, ext2/ext3/ext4, xfs, jfs, HFS+, and more. For unsupported file systems, it defaults to sector-by-sector cloning.
How do I restore a backup using Clonezilla?
Boot from the USB, select the restore option, and follow the prompts to select your backup image and destination drive.
Is it really free disk cloning software?
Yes, it is completely free and open-source under the GNU General Public License (GPL).
Can it clone an encrypted drive?
The software can clone encrypted drives sector by sector but cannot read or modify encrypted content.
How do I enable persistence in Clonezilla?
Use tools like YUMI that support persistence to enable persistent storage on a USB drive.
This versatile and efficient tool is excellent for partition cloning or entire disk cloning and imaging while on the go. Whether you're using Windows or Linux, creating a Live bootable USB is pretty straightforward.
