Want to try a Live USB Kubuntu without installing it on your hard drive? A bootable USB lets you test it in live mode. With persistence enabled, you can save files, settings, and installed software for future sessions. This guide shows how to create a Kubuntu live bootable USB using tools like YUMI, Etcher, and dd, on Windows, Linux, or macOS.
How to Make a Kubuntu Live Bootable USB Drive

Kubuntu Live USB Overview

- Website: kubuntu.org
- Developed by: Canonical Ltd.
- Persistence: Supported
What Is Kubuntu?
Kubuntu is a user-friendly Linux distribution based on Ubuntu and built around the KDE Plasma desktop. It provides a polished interface and a suite of KDE applications such as Dolphin, Konsole, and KDE Connect.
Why Use a Live USB?
Live USBs are also useful for troubleshooting systems with damaged or unbootable operating systems. You can use them to recover files, test hardware compatibility, or browse privately without leaving a trace. For travelers or tech support professionals, a persistent Kubuntu USB can serve as a lightweight and portable Linux workstation on any compatible PC.
A Kubuntu Live USB lets you:
- Test the OS without installing it
- Troubleshoot systems
- Carry a portable desktop
- Save changes when using persistence
What You'll Need
- PC or Mac: Windows, Linux, or macOS
- USB Drive: 8GB minimum (16GB+ recommended for persistence)
- Kubuntu ISO: Download here
- Tool: YUMI, Etcher, or dd
Warning: All of these methods will erase your USB drive. Make sure to backup anything you want to keep before proceeding.
Make a Kubuntu Bootable USB on Windows
There are many ways to go about making a Kubuntu Live bootable USB drive from Windows. Here are two:
Method 1: YUMI (Recommended for Persistence)
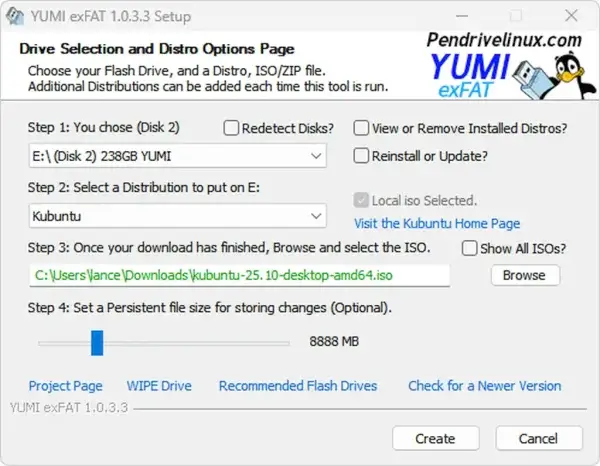
- Download and launch YUMI.
- Select your USB drive.
- Choose "Kubuntu" from the distribution list.
- Browse to your Kubuntu ISO.
- Set a persistence file size (optional).
- Click Create and follow on screen prompts.
- Reboot and boot from USB via BIOS/UEFI.

Method 2: dd for Windows (Advanced)
Warning: This method can easily accidently overwrite your hard drive if misused, be careful.
- Identify your USB disk with
diskpartandlist disk. - Run
select disk Xandclean(replace X). - Download dd.exe.
- Write the ISO:
dd if=path\to\kubuntu.iso of=\\.\PhysicalDriveX bs=4M - Safely eject the USB.
Create a Kubuntu USB on Linux
Here are two simple methods you can use to create a Kubuntu Live bootable USB drive from Linux:
Option 1: dd (Terminal)
- Check device with
lsblk. - Run:
sudo dd if=kubuntu.iso of=/dev/sdX bs=4M status=progress conv=fdatasync - Finish with:
sudo eject /dev/sdX
Option 2: Etcher (GUI)
- Download balenaEtcher.
- Select the ISO
- Choose target USB flash drive.
- Click "Flash!" to begin.

Create a Kubuntu USB on macOS
Mac users can also create a bootable Kubuntu USB using the dd command via Terminal or using a graphical tool such as Etcher.
Method 1: Use Etcher
- Download and install the Etcher dmg file for macOS
- Launch Etcher, select the Kubuntu ISO file, and choose your USB drive.
- Click "Flash" to begin writing the image.
Method 2: Use Terminal (dd)
- Download the Kubuntu ISO.
- Insert USB and run:
diskutil list - Unmount the USB:
diskutil unmountDisk /dev/diskX - Write ISO to USB:
sudo dd if=~/Downloads/kubuntu.iso of=/dev/rdiskX bs=4m - Once finished:
diskutil eject /dev/diskX
Enable Persistence (Optional)
If not using YUMI, you can create persistence manually:
- Mount the USB:
sudo mount /dev/sdX1 /mnt/usb - Create file:
sudo dd if=/dev/zero of=/mnt/usb/persistence.img bs=1M count=4096 - Format it:
sudo mkfs.ext4 /mnt/usb/persistence.img - Rename:
sudo mv /mnt/usb/persistence.img /mnt/usb/casper-rw - Label it:
sudo e2label /mnt/usb/casper-rw casper-rw - Unmount:
sudo umount /mnt/usb
Install Kubuntu from USB Permanently
Boot from your live Kubuntu USB and click the "Install Kubuntu" icon on the desktop. Follow the guided steps for language, partitioning, and user setup.

FAQs
Can I use Rufus instead of YUMI?
Yes, but Rufus doesn't support persistent storage for Ubuntu-based systems by default. Use YUMI if persistence is needed.
Why won't my USB boot?
Check BIOS/UEFI settings. Disable Secure Boot and ensure USB is selected as the primary boot option.
How much space should I allocate for persistence?
4GB is the minimum. For more space and larger apps, use 8GB or more and format with ext4 to avoid FAT32 limitations.
Is Kubuntu good for beginners?
Yes. It offers a familiar interface, built-in KDE tools, and is beginner-friendly for users switching from Windows or macOS.
Conclusion
Creating a bootable Kubuntu live USB drive is a great way to explore Linux, recover systems, or run a portable desktop. Whether you're on Windows, Linux, or macOS, you can get up and running in minutes with tools like YUMI, Etcher, or dd.
