How to Effortlessly Make a USB Bootable KALI Linux with Persistence Using YUMI on Windows: KALI Linux, based on Debian, is designed specifically for penetration testing and security auditing. It includes a vast collection of security tools such as network analyzers, password crackers, wireless testing utilities, exploit frameworks, and fuzzers, making it ideal for cybersecurity professionals, students, and enthusiasts.
KALI Linux Live Bootable USB with Persistence


Distribution Website: Kali Linux Project Page
Persistent Feature: Yes
About KALI Linux
KALI Linux is a powerful penetration testing distribution built on Debian and maintained by Offensive Security. It is the direct successor to BackTrack Linux, which was discontinued in 2013. While BackTrack relied on KNOPPIX, Kali modernized the platform while preserving the same philosophy of portable, professional grade security testing.
Today, Kali Linux ships with over 600 pre installed security tools including Metasploit, Nmap, Wireshark, Burp Suite, Aircrack-ng, and John the Ripper. These tools support real world testing scenarios such as vulnerability assessment, wireless auditing, digital forensics, password recovery, and red team operations.
Kali supports multiple desktop environments including XFCE, GNOME, and KDE, allowing users to balance performance with usability. It follows a rolling release model, ensuring that tools and kernels remain up to date without major version upgrades.
One of Kali's most valuable features for USB installations is persistence, which allows files, configurations, installed tools, and system changes to survive reboots. This makes Kali Linux especially effective when run from a bootable USB drive.
What Is USB Persistence?
A KALI Linux Live USB with persistence allows you to retain files, configurations, and installed packages across reboots. Kali uses the Debian persistence method.
Persistence works by creating either:
- A persistent partition, or
- A persistent storage file
The persistence storage must be formatted as ext3 or ext4, labeled persistence, and contain a persistence.conf file with the following line:
/ union
YUMI automates this entire process for Windows users by creating the persistence file during USB creation.
YUMI Essentials to Make a KALI Linux Live USB
- YUMI exFAT (for BIOS and UEFI boot support)
- KALI Linux ISO file
- High speed USB flash drive (8 GB minimum, 16 GB or larger recommended)
- Windows 11, 10, or 8
- Computer capable of booting from USB via UEFI or Legacy BIOS
How to Make a KALI Linux Bootable USB Using YUMI (Windows)
This method is recommended for most users. YUMI supports persistence, multiboot configurations, and both UEFI and Legacy BIOS systems.
Step 1: Download and Launch YUMI
Download and run the YUMI exFAT Bootable USB Creator.
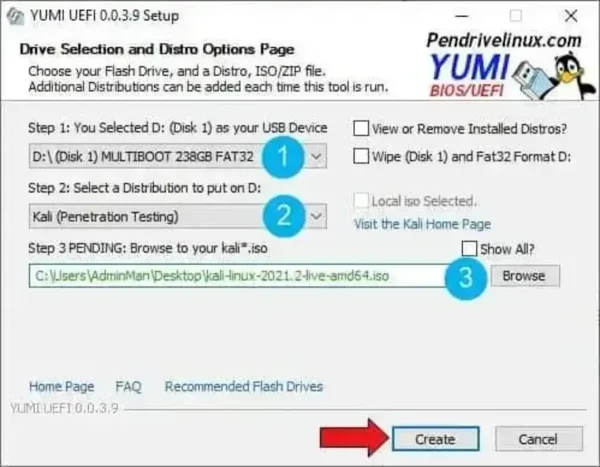
Step 2: Configure YUMI
- Select your USB drive from the device list.
- Check the option to prepare the device.
- Choose "Kali Linux (Penetration Testing)" from the distribution list.
- Browse to your Kali Linux ISO file.
- Click Create to begin.

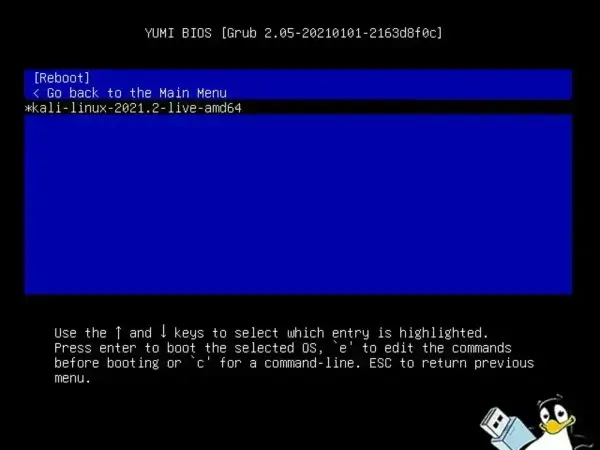
Step 3: Boot Kali Linux from USB
- Restart your computer and enter the BIOS or boot menu.
- Select your USB device as the boot target.
- From the YUMI menu, choose Kali Linux Live or Kali Linux Live with Persistence.

How to Make a KALI Linux Bootable USB on Linux (dd Method)
Linux users can create a Kali Linux USB by writing the ISO directly to the USB drive using the dd command. Persistence must be added manually.
Linux Requirements
- Kali Linux ISO file
- USB flash drive (8 GB or larger)
- Linux system with dd and root access
- gparted or similar partition editor
Write the ISO to USB
- Identify the USB device:
sudo fdisk -l
- Write the ISO:
sudo dd if=/path/to/kali-linux.iso of=/dev/sdX bs=4M status=progress
Adding Persistence to Your KALI Linux Live USB
- Open
gparted(or a similar partitioning tool) and select your USB drive. - Create a new partition in the unallocated space on the USB. Format this partition as ext4 and label it persistence.
- Once formatted, mount the new persistence partition. Then, create a file called
persistence.conf:echo "/ union" | sudo tee /mnt/persistence/persistence.conf
This configuration enables the persistence feature by specifying that changes should be saved across reboots.
- Unmount the partition, and your KALI Linux USB is now configured with persistence. Boot from this USB and select the "Live USB Persistence" option to enable saving of data across sessions.
This dd method is an effective way to create a bootable KALI Linux USB directly from Linux. It's especially useful for those comfortable with command line operations and offers more control over partitioning for persistence.
How to Make a KALI Linux Bootable USB on macOS
macOS users can create a Kali Linux USB using balenaEtcher or the built in dd command.
Method 1: balenaEtcher (Recommended)
- Download balenaEtcher.
- Select the Kali Linux ISO.
- Select your USB drive.
- Click Flash.
Method 2: macOS dd Command
diskutil list
diskutil unmountDisk /dev/diskX
sudo dd if=/path/to/kali-linux.iso of=/dev/rdiskX bs=4m status=progress
diskutil eject /dev/diskX
Persistence must be added later using Linux tools.
Default Kali Linux Credentials
- Username: kali
- Password: kali
KALI Linux FAQ
Can I install additional tools with persistence?
Yes. Installed software, files, and configuration changes are retained when persistence is enabled.
Does Kali Linux support UEFI and Legacy BIOS?
Yes. YUMI supports both boot modes.
Does USB speed matter?
Yes. USB 3.0 or faster drives significantly improve performance.
Alternative to Kali Linux: Parrot Security OS
| Feature | Kali Linux | Parrot OS |
|---|---|---|
| Focus | Penetration testing | Security and privacy |
| Base | Debian | Debian |
| Privacy Tools | No | Yes |
Final Notes
A USB Kali Linux with persistence provides a portable, powerful penetration testing environment that can also remember and restore some of your settings and changes. Whether created on Windows, Linux, or macOS, this setup allows you to carry your tools, configurations, and workflows anywhere.
Why This Method Works
- USB Kali Linux Persistence support
- UEFI and BIOS compatibility
- Gain Multiboot capability with YUMI
- Alternative methods for all major operating systems
