
Learn how to create a USB CentOS Stream bootable flash drive from an ISO file on Windows, Linux, or macOS. This guide shows how to write the official installer ISO to a flash drive so you can boot, test, and optionally install CentOS Stream on a PC or server. A bootable USB is ideal for evaluating the platform, learning enterprise Linux workflows, or preparing for deployment.

What Is CentOS Stream?
CentOS Stream is a continuously updated Linux distribution positioned just ahead of Red Hat Enterprise Linux in the development pipeline. Unlike the former CentOS Linux, which rebuilt RHEL downstream, Stream provides a rolling preview of features destined for future RHEL releases.
It is widely used by developers, system administrators, and infrastructure teams who want to test upcoming enterprise Linux changes while staying aligned with Red Hat ecosystems.
Key Features
- Upstream development for RHEL: Tracks changes before they are included in Red Hat Enterprise Linux.
- Rolling release: Continuous updates keep the system current.
- Enterprise-ready: Suitable for testing, CI/CD pipelines, and validation of workflows.
- Open source: Maintained by Red Hat and community contributors.
Requirements
- Computer running Windows, Linux, or macOS
- USB flash drive, 8 GB or larger recommended
- CentOS Stream ISO file
- USB writing tool such as Etcher, YUMI, or command-line utilities
Project Home: Official Project Page
Persistence: Not supported by default as this is an installer only.
Download CentOS Stream
Before creating your bootable USB, download the latest CentOS Stream ISO image from the official project website. Choose the correct architecture for your system, then proceed with one of the USB creation methods below.
Create a USB CentOS Stream on Windows
Two reliable approaches are available: direct ISO writing for a single-purpose boot drive or a multiboot setup using tools like YUMI.
Method 1: Using Etcher (GUI)
- Download and install Etcher.
- Insert your USB flash drive.
- Open Etcher, select the ISO, and choose the USB drive as the target.
- Click Flash and wait for completion.
Safely eject the USB after flashing.
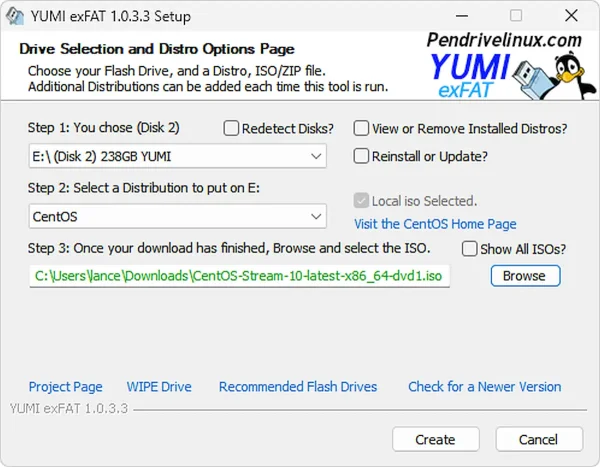
Method 2: Using YUMI (Multiboot)
- Download YUMI and launch the tool.
- Select your USB drive and use the "Prepare Drive" option to format it.
- Choose CentOS or Try Unlisted ISO from the distribution list.
- Browse to the CentOS Stream ISO file and click Create.
Create a CentOS Stream USB on Linux
Linux users can use Etcher for a GUI or `dd` for a command-line approach.
Method 1: Using Etcher (GUI)
- Download and install Etcher for Linux.
- Insert the USB drive.
- Open Etcher, select the ISO and target USB drive.
- Click Flash and wait until done, then safely eject.
Method 2: Using dd (Command Line)
sudo dd if=/path/to/CentOS-Stream.iso of=/dev/sdX bs=4M status=progress && sync- Replace
/path/to/CentOS-Stream.isowith the ISO path. - Replace
/dev/sdXwith your USB device (e.g.,/dev/sdb). - Verify the correct device using
lsblkorsudo fdisk -l. - Warning:
ddwill overwrite the selected drive.
Create a CentOS Stream USB on macOS
Mac users can also use Etcher or `dd` via Terminal.
Method 1: Using Etcher (GUI)
- Download Etcher for macOS and move it to Applications.
- Insert your USB drive.
- Select the ISO and USB drive, then click Flash.
- Wait for completion and safely eject the USB.
Method 2: Using dd (Terminal)
diskutil list
diskutil unmountDisk /dev/diskN
sudo dd if=/path/to/CentOS-Stream.iso of=/dev/rdiskN bs=4m
sync- Identify your USB with
diskutil list(e.g.,/dev/disk2). - Use
rdiskNfor faster writing. - Replace
/path/to/CentOS-Stream.isowith the ISO path. - Caution: Wrong device selection can overwrite macOS.
Booting from USB
- Restart the computer with the USB inserted.
- Open BIOS/UEFI or Boot Menu during startup.
- Select the USB drive as the boot device.
- Boot into the installer environment to start installation.
Installing CentOS Stream from USB
Select Install CentOS Stream to start a full installation. The installer supports advanced partitioning, LVM, encryption, and network configuration, similar to RHEL.
Troubleshooting
- USB does not boot: Disable Secure Boot or switch between UEFI and Legacy modes.
- Display issues: Use basic graphics mode.
- Installation fails: Verify ISO checksum or recreate the USB.
Final Notes
A bootable CentOS Stream USB provides a portable way to explore enterprise Linux development. For production stability, consider AlmaLinux or Rocky Linux; for development, testing, and early access to RHEL features, Stream remains the best choice.
