Install Xubuntu on USB: Create a bootable Xubuntu Live USB drive using Windows or Linux. In this guide, you'll learn how to easily install Xubuntu onto a USB flash drive using YUMI Multiboot software, Etcher, or the dd command. The YUMI USB boot method also supports persistence—allowing you to save changes between sessions by selecting a persistent file size during setup.
Xubuntu Live Bootable USB

What Is Xubuntu?
Xubuntu is a lightweight Linux distribution based on Ubuntu and Debian. It uses the Xfce desktop environment, known for its simplicity and efficient resource usage.
With a simple desktop and lower hardware requirements, it is ideal for older systems or users seeking a fast, responsive desktop. It comes with pre-installed applications and allows access to additional software through Ubuntu's repositories. Regular releases, including long-term support (LTS) versions, provide stability and flexibility.
- Official Website: Project Home Page
- Minimum USB Drive Size: 2 GB
- Persistence Supported: Yes
What You'll Need
- Windows 7, 8, 10, or 11
- Xubuntu ISO file
- Fast USB flash drive
- YUMI, dd for Windows, or Win32 Disk Imager
Methods to Put Xubuntu on USB (Windows & Linux)
Here’s a comparison of common tools used to create a bootable USB for Xubuntu:
| Tool | Platform | Ease of Use | Persistence | Best For |
|---|---|---|---|---|
| YUMI | Windows | Beginner friendly | Yes | Multiboot setups and persistent storage |
| dd (Windows) | Windows | Command line, advanced | No | Experienced users needing raw ISO write |
| Win32 Disk Imager | Windows | Simple GUI | No | Straightforward ISO-to-USB flashing |
| dd (Linux) | Linux | Command line, advanced | No | Linux users comfortable with terminal |
| balenaEtcher | Linux / Windows / macOS | Very easy GUI | No | Cross-platform users seeking simplicity |
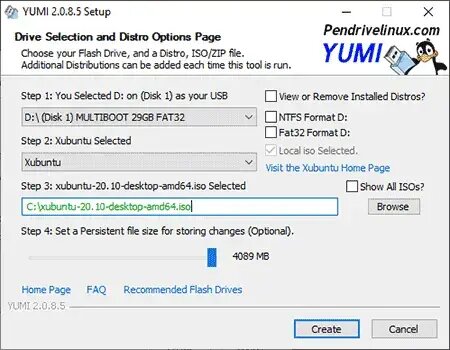
Creating a Xubuntu Live USB with YUMI
- Download and open YUMI.
- (1) Select your USB drive.
(2) Choose "Xubuntu" as the distribution.
(3) Locate your ISO file.
(4) Choose a persistent file size if desired, then click Create.

- Once done, reboot and select your USB drive as the boot device from BIOS or boot menu.
Using dd for Windows to Make a Bootable Xubuntu USB
- Download the Xubuntu ISO file.
- Insert a USB drive and back up any important files—it will be erased.
- Open Command Prompt as Administrator and type:
diskpartThen list connected drives:
list diskIdentify the USB drive number.
- Unmount and clean the USB drive using:
select disk Xclean - Download dd for Windows.
- Write the ISO to the USB using:
dd.exe if=path\to\xubuntu.iso of=\\.\PhysicalDriveX bs=4M- if= Path to your ISO file
- of= USB drive number (e.g., PhysicalDrive1)
- bs=4M sets block size for performance
- Wait for completion, then safely eject the USB drive.
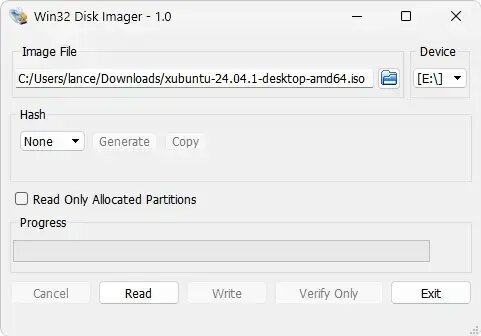
Make an Xubuntu Live USB Using Win32 Disk Imager
- Download Xubuntu.
- Get Win32 Disk Imager.
- Insert the USB and launch the application.
- Select your ISO and USB drive, then click "Write".
- Confirm any overwrite warnings, and let it complete.

- Once finished, eject the drive safely.
Create a bootable USB Xubuntu on Linux
If you're already running a Linux distribution, there are native tools you can use to create a bootable USB Xubuntu. Below are two popular methods—one using the terminal and another using a graphical interface.
Method 1: Using dd from the Linux Terminal
- Download the ISO:
Get the latest Xubuntu ISO from the official download page. - Insert and Identify the USB Drive:
Open a terminal and run:lsblkFind your USB drive (e.g.,
/dev/sdX). Be very careful to identify the correct device, as this process will overwrite it. - Write the ISO to the USB:
Use theddcommand to write the image:sudo dd if=path/to/xubuntu.iso of=/dev/sdX bs=4M status=progress conv=fsync- if= path to your ISO
- of= your USB device (not a partition, no number)
- Wait for completion (it may take a few minutes). Once done, run:
syncThen safely eject the USB drive:
sudo eject /dev/sdX
Method 2: Using balenaEtcher (GUI)
- Install balenaEtcher. It's available as an AppImage or from Snap:
sudo snap install balena-etcher-electron - Launch Etcher, then:
- Click "Flash from file" and select your Xubuntu ISO
- Insert your USB drive and select it
- Click "Flash!" to begin the process
- Once done, Etcher will validate and automatically unmount the drive. You can now boot from the USB stick.
Optional: Making a Persistent Xubuntu USB on Linux
Standard `dd` and Etcher methods do not support persistence out of the box. To create a persistent Xubuntu Live USB on Linux:
- Use tools like UNetbootin or Live USB Creator.
- Alternatively, manually create a casper-rw partition after writing the ISO and configure the bootloader.
Note: Persistence setup can be advanced on Linux. For ease, YUMI on Windows offers a simpler setup for persistent storage.
Booting and Troubleshooting
USB Not Detected
Ensure the drive is visible in BIOS/UEFI. Try another port or update boot order.
Failed to Boot
Verify ISO integrity or recreate the bootable USB using a different method.
Slow Performance
Use a USB 3.0 flash drive or SSD-based stick for faster load times.
Installing Xubuntu from the USB

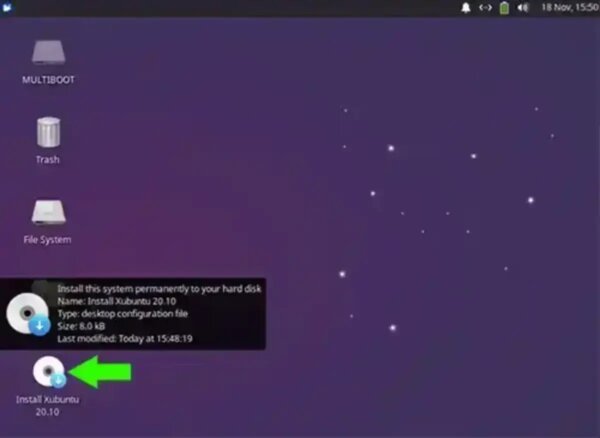
To install Xubuntu on a hard drive, boot from your USB and select "Install Xubuntu" from the desktop. Follow the guided installer.
Final Thoughts on USB Xubuntu
Creating a Xubuntu bootable USB is quick and flexible using tools like YUMI, dd, or Win32 Disk Imager. With support for persistence and broad hardware compatibility, this small Linux distribution offers a fast, Live, portable USB Xubuntu booting experience perfect for older PCs or testing a lightweight OS without installation.
