Easily Write Image ISO to USB: Win32 Disk Imager is a free and open source utility for writing disk image files to USB drives and SD cards. It supports both ISO and IMG formats, making it useful for creating bootable media, backing up removable storage, or duplicating Raspberry Pi SD cards. Whether you're a hobbyist, developer, or sysadmin, this tool offers a simple, reliable solution for image writing and recovery tasks.

What is Win32 Disk Imager?
Win32 Disk Imager is a Windows-based tool that allows you to write raw disk image files directly to USB drives or SD cards. It can also read an existing device and save a complete image backup in .img format.
Common use cases include:
- Flashing a bootable operating system from an ISO or IMG file
- Cloning a Raspberry Pi SD card or USB flash drive
- Creating backups of a USB drive for later restoration
- Restoring a device to a previous state using a saved image
Who Uses It?
This tool is popular among:
- Raspberry Pi users – for creating and restoring SD card images
- System administrators – for quick OS deployments
- IT repair professionals – for cloning or restoring drives
- Developers and QA testers – who need consistent USB environments
Though it lacks a modern UI, its efficiency and reliability make it a go-to choice for advanced users.
Features of Win32 Disk Imager
- Write image files – Supports both ISO and IMG formats
- Backup drives – Save the full contents of a USB or SD card as an image
- Hash verification – Check integrity of written data
- Supports various devices – USB sticks, SD/microSD cards, external HDDs
- Free and open source – Community-supported and frequently updated
How It Works
Win32 Disk Imager performs a low-level, sector-by-sector write operation. This means it copies everything, including bootloaders and partition tables, which results in an exact replica of the source image.
Be aware: writing an image will overwrite everything on the target drive. It may not be recognized by Windows until reformatted, which is normal. You can restore the drive using tools like Windows Disk Management or GParted on Linux.
Writing a Disk Image to USB
To create a bootable USB stick or flash an image:
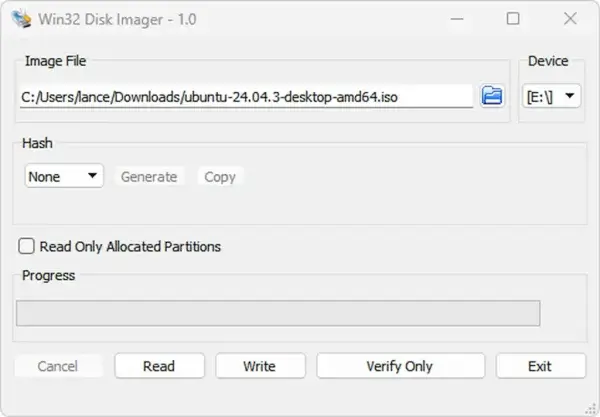
1.) First, download Win32 Disk Imager and extract the contents of the zipped archive to a folder.
2.) Then right click Win32DiskImager.exe and select to run as Administrator.
- Click the folder icon to locate your .img or .iso file.
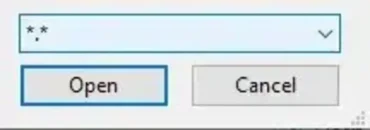
Tip: Use the *.* filter in the file browser to display all file types.

- Select the correct drive letter for your USB device.
- Click Write to begin the process.

Writing an Image to USB
Backing Up a USB Drive
Win32 Disk Imager also allows you to create a complete image of your USB device for backup or duplication.
Steps to Back Up a USB as an IMG File
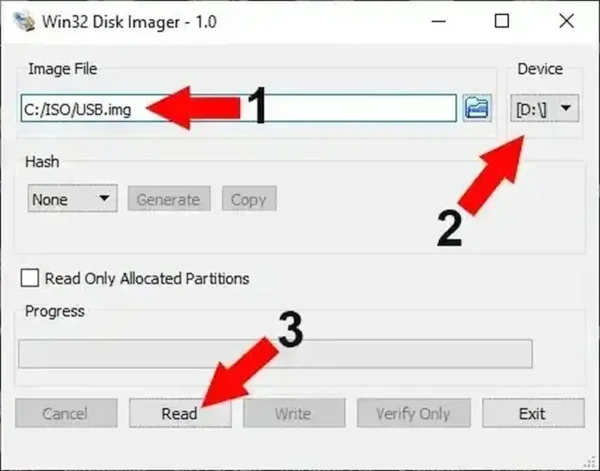
- Enter a file path and name for your backup image.
- Select your USB or SD device from the dropdown.
- Click Read to copy the device into an IMG file.

Creating a backup image of a USB drive
Alternatives to Win32 Disk Imager
If you're looking for tools with a more modern interface or different OS support, consider:
- Etcher – User-friendly and cross-platform
- Universal USB Installer – Supports persistent storage with Linux ISOs
- UNetbootin – Lightweight and Linux-focused
Writing ISO to USB on Linux
Obviously Win32 Disk Imager is a Windows based tool, Linux users can simply use the built in dd utility to create bootable USB drives.
Warning: dd will erase your selected drive without confirmation. Double check the device path.
Example Usage
- Open Terminal
- Find your device:
lsblk - Unmount the drive:
sudo umount /dev/sdX - Write the image:
sudo dd if=/path/to/image.iso of=/dev/sdX bs=4M status=progress - Finalize the write:
sync
FAQ - About Disk Imaging and USB Cloning Tools
What's the difference between ISO and IMG files?
ISO files are structured for optical media like CDs and DVDs and often contain bootable OS setups. IMG files are raw sector-by-sector disk images that include the entire drive layout, bootloaders, and partitions, making them ideal for full backups or cloning a flash drive.
Can I back up a USB stick, flash drive, or SD card using this tool?
Yes. this tool lets you read from a USB drive or SD card and save the full contents as a .img file. This is perfect for cloning drives or making an exact backup of a bootable memory stick.
Will the USB be bootable after writing an ISO or IMG file?
If the source image is bootable (e.g., Linux distro, Windows installer, recovery ISO), the target USB drive will also be bootable after the write process. Always verify the image source before flashing.
Why does my USB drive appear corrupted or unreadable in Windows after using Win32 Disk Imager?
After writing a raw image, the USB may not show up properly in Windows Explorer because it uses a non-Windows-compatible partition layout. You can reformat the drive using Disk Management (Windows) or GParted (Linux) to restore normal functionality.
How does Win32 Disk Imager compare to Etcher?
Etcher is more beginner-friendly and works on Linux/macOS, but Win32 Disk Imager offers image reading and is ideal for advanced Windows users.
Can I use this tool to create a bootable USB installer for Windows or Linux?
Yes. As long as your ISO or IMG file contains bootable content, you can create a bootable USB installer for operating systems like Windows, Ubuntu, Debian, or even rescue environments like Hiren's Boot CD.
Is it possible to duplicate or clone USB drives or SD cards exactly?
Yes. First use the Read function to save the source drive as an IMG file, then use the Write function to flash that image onto another identical sized drive. This is commonly used to clone Raspberry Pi cards or replicate embedded system boot drives.
Does Win32 Disk Imager work with external hard drives or SSDs?
It can work with any removable device recognized as a volume by Windows, including USB external drives and SSDs. Just be cautious when selecting the correct drive letter, as the write process is destructive.
Is there a risk of damaging my USB device?
No physical damage will occur, but writing an image will overwrite all existing data. Always double-check your selected device and keep backups to avoid accidental data loss.
What should I do if the written USB doesn't boot?
First, check if the source ISO or IMG is bootable. Then ensure your BIOS/UEFI is set to boot from USB. If the USB still doesn't boot, try using an alternative tool like Etcher, which can help write bootable USBs with certain image formats.
Can I use Win32 Disk Imager to make a recovery USB drive?
Yes. If you have a recovery ISO or a system backup saved as an IMG file, you can use it to write it to a USB stick and create a recovery drive. This is useful for restoring crashed systems or repairing bootloaders.
Does Win32 Disk Imager support UEFI boot images?
It does not modify or optimize for BIOS vs. UEFI specifically, it performs a raw write of the image. If your ISO or IMG supports UEFI, the resulting USB should as well, assuming your target device supports UEFI boot.
Can I use Win32 Disk Imager on Windows 11?
Yes, it works on Windows 11, 10, and older versions like Windows 7 and 8. Just be sure to run it as Administrator to avoid write permission issues.
What file systems are supported?
Win32 Disk Imager doesn't care about the file system, it writes raw images bit-for-bit. The source image's format (FAT32, NTFS, ext4, etc.) will be replicated exactly on the target device.
Final Thoughts on Win32 Disk Imager
In summary, Win32 Disk Imager continues to be a trusted tool for creating bootable drives, cloning USBs, and backing up removable media. It's not flashy, but it's fast, lightweight, and does exactly what it promises. Whether you're setting up Raspberry Pi SD cards, making disaster recovery images, or cloning test environments, this tool deserves a spot in your tech toolkit.
Looking for a dependable way to work with disk images or clone USB drives? Give it a try.
