UNetbootin - Create a Live Linux USB

UNetbootin can be used to quickly create a Live Linux flash drive from an ISO file. There are versions of this cross platform Live USB generation utility for Windows, Linux, and MacOS X. The fact that this bootable USB creator works with every major operating system is a benefit.

UNetbootin Live USB Creation from an ISO
Live Linux bootable USB creation with UNetbootin

Most Live Linux distributions are supported right out of the box, and there are custom install options available for ISO distributions that are not.

What is UNetbootin?

UNetbootin (short for "Universal Netboot Installer") is an open-source software application that allows users to create bootable Live USB drives for various Linux distributions from ISO files, eliminating the need for a CD or DVD media. It is a convenient tool for users who want to try out or install Linux on a computer without using a traditional installation disc. Originally authored by Geza Kovacs, it was released under the GNU GPL v2. More information can be found on the Official Project Page.

Key Features of this boot from USB media creation tool include:

  • Linux, FreeBSD, NetBSD ISO file Support: Supports various Linux distributions and other operating systems like FreeBSD and NetBSD.
  • Easy Live USB Creation: Creates a bootable Live USB drive, allowing you to run a complete operating system directly from the USB drive without installing it on the hard drive.
  • Download ISO Files: Can download and install various Linux distributions directly from the internet, or use an existing ISO file.
  • Cross-Platform Compatibility: Available for Windows, Linux, and macOS.

Frequently Asked Questions (FAQ)

Q: Can I create a multi-boot USB with UNetbootin? A: No, UNetbootin currently does not support creating multi-boot USB drives. For multibooting capabilities, consider using a UNetbootin alternative such as YUMI, UUI or Ventoy.

Q: Does UNetbootin support persistence? A: At the time of the original post, it did not support persistence, meaning changes made during a Live session will not be saved after rebooting. For persistent Live USBs, you may want to use software such as the Universal bootable USB Installer, or the YUMI multiboot USB media creation tool.

Q: Why is my USB drive not recognized by UNetbootin? A: Ensure your USB drive is properly formatted and connected. Sometimes, using a different USB port or reformatting the drive to FAT32 can help. Additionally, ensure that the drive is not mounted or in use by another application.

Q: What should I do if my USB drive doesn’t boot? A: Make sure your BIOS/UEFI is set to boot from the USB drive. Access the BIOS/UEFI settings during startup (usually by pressing a key like F2, F12, DEL, or ESC), and adjust the boot order to prioritize the USB drive. If the issue persists, try recreating the bootable USB with a different tool or verify the integrity of your ISO file.

Q: Can I use UNetbootin to install Windows? A: It is primarily designed for creating bootable USB drives for Linux distributions. For creating a bootable USB drive to install Windows, previously mentioned tools like YUMI or UUI are recommended.

Q: Is there a risk of data loss when using UNetbootin? A: Creating a bootable USB with this utility will format the USB drive, which will erase all existing data on it. Make sure to back up any important data before proceeding.

Q: Can I use UNetbootin on macOS? A: Yes, there is a version made available for macOS. The process for creating a bootable USB is similar to that on Windows and Linux. Download the macOS version from the official website, and follow the same steps to create your Live USB.

Q: What if my Linux distribution is not listed? A: If your desired Linux distribution is not listed, you can still use an ISO file. Select the "Diskimage" option, browse to your ISO file, and proceed with creating the bootable USB.

Using UNetbootin to Make a Live Linux USB in Windows

The following assumes you are working from within Windows and have a current copy of the ISO you wish to convert. So before proceeding, make sure to have a copy of your favorite Linux ISO file on hand. Then, to make a Live Linux USB from within Windows:

  1. Download UNetbootin - grabbing the version for Windows.
  2. Double click the unetbootin-windows-###.exe to run the program.
  3. Next, to prepare and make your USB bootable:
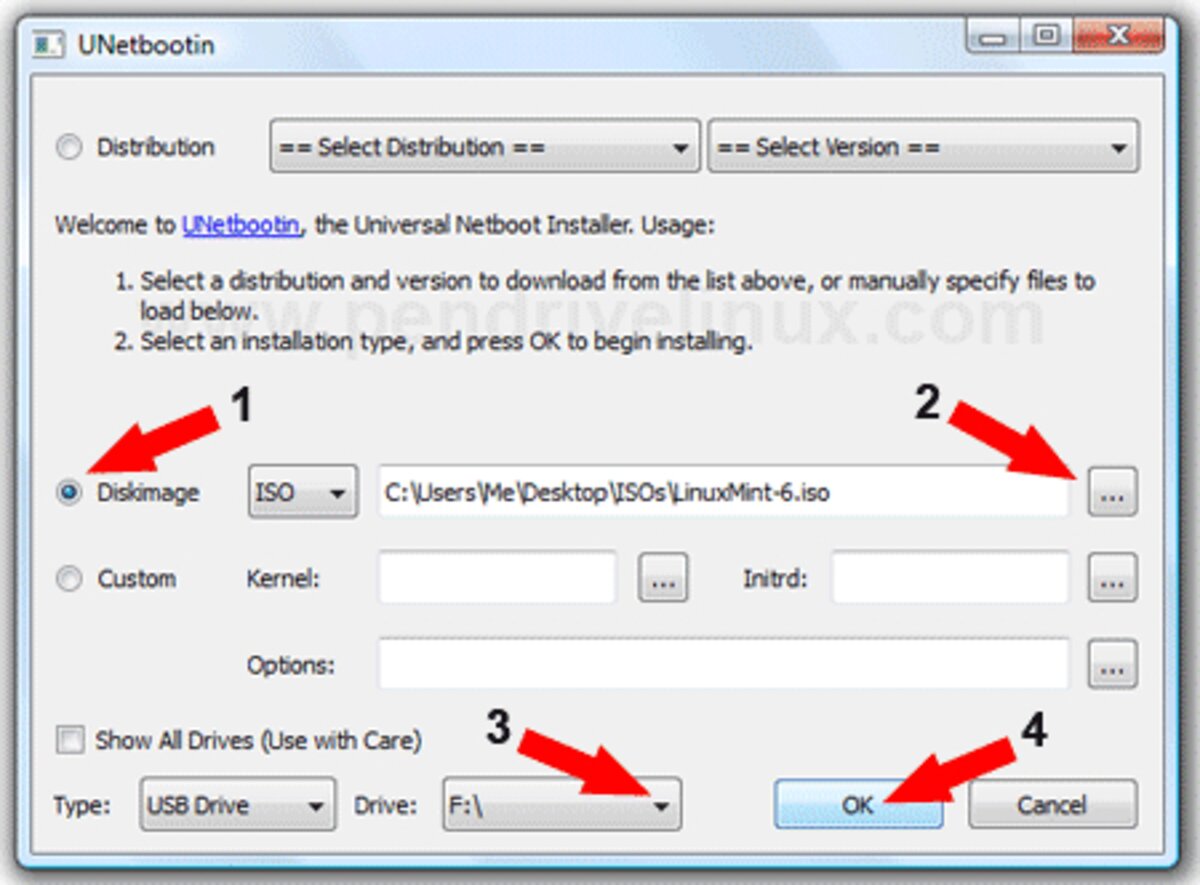
    (1.) Click the Diskimage radio box.
    (2.) Browse to select your ISO.
    (3.) Set your target USB drive.
    (4.) Click OK to start the creation.

    UNetbootin Windows Live USB Creation from an ISO
    Windows Live USB Creation from ISO
  4. Once the installation has completed, select the option to Reboot Now.

    UNetbootin installation finished
    Finished creating a bootable USB - Reboot Now
  5. During the reboot at the system post:
    (1.) Use your motherboard hotkey to enter your system BIOS/UEFI.
    (2.) Set your system to USB boot from your flash drive as the first device, and save your changes.
    (3.) Then, proceed to start running your favorite Live Linux on USB.

How to Install UNetbootin on Ubuntu

This Live USB creation tool can also be used to create a Live Linux USB flash drive from within Linux. In the following section, I cover how to use the boot from usb tool within an Ubuntu Linux operating environment.

To install and run the Linux version from Ubuntu:

  1. Open a terminal (applications > accessories > terminal) or Ctrl+Alt+T
  2. Type the following commands into the terminal pressing enter after each.
    (1.) Download the latest version;
wget unetbootin.sourceforge.net/unetbootin-linux-latest

(2.) Make the archive executable;

chmod +x ./unetbootin-linux-*

(3.) * Extract files from the archive;

sudo apt-get install p7zip-full

(4.) Run the UNetbootin program;

sudo ./unetbootin-linux-*

* Alternately, if an archive manager utility is already installed, you might be able to simply double click the unetbootin-linux-* file to run it, since the archive was already marked executable during step 2.

Using UNetbootin Ubuntu to Make a Live Linux USB

To use it from within Ubuntu: First, insert your USB flash drive and start the tool (See step 4 in the previous section).

Option One - Distribution: You can let the tool fetch and download a select Linux distribution from the internet.

  1. Select a Linux distribution from the drop-list.
  2. Choose the distro version you'd like from the second drop-list.
  3. Make sure the correct USB drive is detected and then click OK.

    UNetbootin - download Linux ISO files
    Automatically downloading Linux ISO files from the internet

Option Two - Diskimage: Or you can Browse to and use an existing Linux ISO file.

  1. Browse to the ISO Image you would like the tool to put on your USB drive.
  2. Make sure the correct USB flash drive is detected and then click OK.

    UNetbootin DiskImage - use existing ISO Option
    Choose to use an existing ISO file
  3. After installation, click Reboot Now.

    unetbootin installation complete
    Installation complete - Reboot
  4. During startup (before your computer begins loading an operating system):

This concludes the process of using UNetbootin to create and boot your favorite Linux ISO from a USB flash drive.