Easily create a bootable USB drive for Ultimate Boot CD (UBCD) using tools like YUMI, dd for Windows, or the dd command on Linux or macOS. UBCD is a widely respected diagnostics tool that consolidates over 100 essential system utilities into a single ISO image.
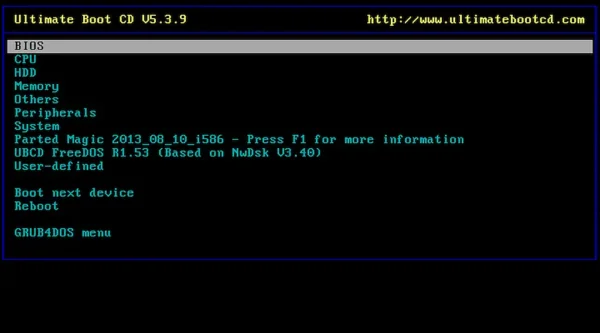
Ultimate Boot CD Running from a Bootable USB

The Ultimate Boot CD is a comprehensive toolkit of diagnostic and system recovery tools compiled into a bootable ISO. Originally created by Victor Chew in 2003, it has been maintained by an open source community committed to ongoing updates and improvements.
This USB bootable toolkit includes a wide array of utilities to assist in hardware testing, data recovery, partitioning, system analysis, and more. Whether you're an IT technician or a home user, you'll find it offers some of the most essential tools for troubleshooting computer systems efficiently.
Key features include:
- System Information and Analysis: CPU and memory testing, hardware examination tools.
- Disk and File System Tools: Partition managers, hard disk diagnostics, and file recovery utilities.
- Hardware Testing and Benchmarking: Performance testing and stress testing tools for hardware components.
- Backup and Recovery Software: Backup tools, imaging utilities, and data recovery software.
- Network and Internet Tools: Network diagnostics, testing, and configuration tools.
- Antivirus and Password Recovery: Malware scanning, removal tools, and password recovery utilities.
- System Maintenance Utilities: Registry editors, boot loaders, system diagnostic programs.
- Operating System Repair: Tools to repair bootloaders, recover OS issues, and restore partitions.
- Memory Testing: RAM test suites for diagnosing system memory errors.
- Peripheral Testing: Utilities for troubleshooting USB devices, printers, and other peripherals.
UBCD Specifications
- Home Page: Project Page
- Lead Developer: Victor Chew
- First Release: 2003
- Persistence: Not required – runs in live mode
What You'll Need
- YUMI (for multiboot bootable USB creation)
- UBCD ISO file
- USB drive (preferably a fast USB flash drive)
- A Windows PC, Linux machine, or macOS system to prepare the bootable USB
How to Create a UBCD Bootable USB Drive
Below are three popular methods for creating a bootable UBCD USB, followed by a section for macOS users.
Method 1: Using YUMI (Windows/Linux with WINE)
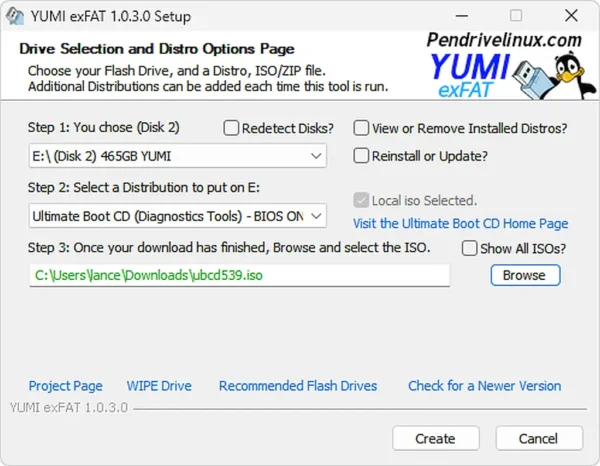
- Download and launch the YUMI Multiboot USB Creator.
- (1.) Select your USB drive (check the box to prepare device if you haven't yet - Note: Drive will be wiped)
(2.) Choose "Ultimate Boot CD (Diagnostic Tools)" from the list
(3.) Browse to your ISO and then click "Create"

- Once installation completes, reboot your system. Enter BIOS/UEFI, select the USB drive as boot device, and save changes with F10.
Method 2: Using dd for Windows
Warning: This method will completely overwrite the target USB drive. Backup any data before proceeding.
- Download and install dd for Windows.
- Open Command Prompt as Administrator.
- Identify your USB drive's physical ID (e.g., using
diskpart). - Run the following command:
dd if=path-to-your\ubcd.iso of=\\.\PhysicalDriveX bs=4M status=progressReplace
path-to-your\ubcd.isowith the actual ISO path andXwith your USB drive number.
Method 3: Using dd on Linux
- Download the ISO: From the UBCD download page.
- Insert USB drive and run:
lsblk - Unmount partitions (replace
Xwith actual letter):sudo umount /dev/sdX* - Write the ISO to the drive:
sudo dd if=path-to-your/ubcd.iso of=/dev/sdX bs=4M status=progress - After completion, eject the drive:
sudo eject /dev/sdX
Alternative GUI Tools for Linux
These tools simplify USB creation but typically only allow one ISO per device. Whereas YUMI is a multiboot USB tool allowing for multiple ISO files to be stored and run from one flash drive.
Method 4: Creating UBCD USB on macOS
macOS users can also create a bootable Ultimate Boot USB drive using the dd command. This method is best suited for Intel-based Macs that support BIOS or UEFI boot modes.
Important: This method erases all data on the USB drive. Make sure to back up anything important first.
- Download UBCD ISO from the official site.
- Insert your USB drive and open Terminal.
- Find the USB device name:
diskutil listNote the identifier (e.g.,
/dev/disk2). - Unmount the USB:
diskutil unmountDisk /dev/diskX - Write the ISO:
sudo dd if=~/Downloads/ubcd.iso of=/dev/rdiskX bs=1mReplace
rdiskXwith the raw disk identifier. - Eject the USB:
diskutil eject /dev/diskX
Restart your Mac, hold the Option (⌥) key, and select the USB drive to boot if supported.
Note: UBCD is not compatible with Apple Silicon (M1/M2/M3) Macs, which lack legacy BIOS support.
Frequently Asked Questions (FAQ)
What is Ultimate Boot CD?
A bootable collection of system diagnostic and hardware troubleshooting tools consolidated into one ISO image.
Is UBCD free?
Yes, it is open-source and free for personal and non-commercial use.
Can I boot UBCD from a USB flash drive?
Yes. Use YUMI, dd for Windows, Linux, or macOS to create a bootable USB drive.
Which tools are included?
CPU testers, memory diagnostics, HDD analyzers, data recovery, network tools, antivirus scanners, and more.
Does UBCD support UEFI?
Primarily designed for BIOS systems. Some UEFI systems may require Legacy/CSM mode enabled.
Can UBCD be used on a Mac?
Yes, on Intel-based Macs with BIOS/UEFI support. It does not work on Apple Silicon Macs.
How do I boot from the USB?
Restart your PC/Mac, access BIOS/UEFI (usually F2, F12, DEL, or ESC), and choose your USB drive.
System requirements?
A compatible BIOS/UEFI PC, 512MB RAM minimum, and a USB flash drive or CD/DVD drive.
Can I customize it?
Yes. Advanced users can add tools by editing the ISO or USB filesystem.
Final Thoughts
UBCD is a powerful, free solution for diagnosing, repairing, and recovering systems. Creating a bootable USB drive with it equips you with a complete set of portable diagnostic tools for a wide variety of tech emergencies.
For best performance:
- Use a fast solid state USB flash drive.
- Verify the ISO download before use.
- Familiarize yourself with each tool in the boot menu.
We hope this guide helped you get up and running with an Ultimate Boot USB. If you have further questions or want to learn more about the tool, feel free to visit the official support forums or send us a message with your suggestions. Happy booting!
