
How to Boot a USB flash drive in VirtualBox. In this segment you will learn how to successfully boot a portable operating system from a USB flash drive or removable external hard drive while still running from within a Windows, Linux, or Mac OS X environment using vbox.
VirtualBox Boot from USB
By default, VirtualBox (vbox) does not provide direct support for booting from USB devices. However, this task can be achieved by creating and mapping a virtual hard disk file (.vmdk) to the USB drive. Effectively allowing you to create a mapped VirtualBox bootable USB.
This method essentially tricks the virtual machine into thinking that the .vmdk file is a USB drive, allowing you to boot from it. It's important to note that this process doesn't directly boot from the physical USB drive; instead, it uses a virtual representation of the USB drive.
The following sections cover booting from a USB flash drive in VirtualBox on Windows, Mac OS, and Linux hosts. This process involves configuring the virtual machine to boot from a USB device. We will also go through the steps necessary to get persistence working for those running their VM from Windows.
Note: I am not sure if you'll need to have "vbox USB passthrough" for VirtualBox installed and enabled. If this proves to be the case, I'll revisit this post to append information on how to do this.
Boot from a USB Flash Drive in VirtualBox (Windows)
- Download VirtualBox and run the installer (Installing to the default path).
- You'll need to use the command line to perform steps 3-6,
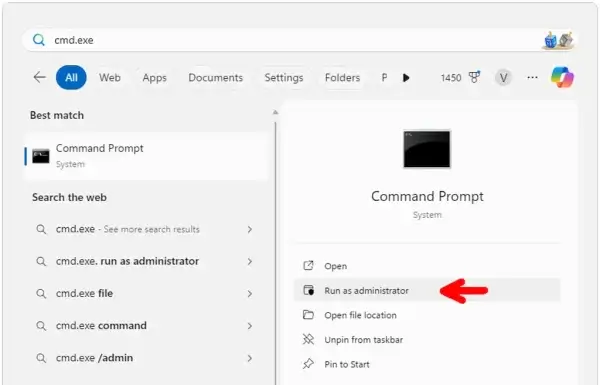
To open a command prompt;
(1.) From the Windows '⌕ Type here to search' box, type cmd.exe
(2.) Then click Run as administrator
Or Alternately a faster way to open Disk Management in Windows (10/11) is by pressing Windows Key + R, typingdiskmgmt.msc, and pressing Enter. - At the command prompt, type diskmgmt.msc and press Enter to open the Windows Disk Management Tool. Then, identify your USB Disk #

- Now, back at the command line, type
cd %programfiles%oraclevirtualbox - Replacing # with your USB Disk number from step 3, type
VBoxManage internalcommands createrawvmdk -filename "%USERPROFILE%".VirtualBoxusb.vmdk -rawdisk .PhysicalDrive# - To start VirtualBox as Admin, type the following from the open command line:
start virtualbox - From the menu, navigate to Machine -> New, and then proceed to Create a New Virtual Machine.

- When prompted for a Virtual Hard Disk;
(1.) Tick use existing hard disk.
(2.) Then, browse to your %USERPROFILE%.VirtualBox folder, and select the usb.vmdk file.
(3.) Press Finish to complete the creation of the USB Virtual Machine.

- Once you have finished creating your New Virtual Machine, click Start

If all goes well, you should now be booting your USB flash drive from VirtualBox within Windows.
Getting Persistence to work in VirtualBox (Windows)
At first the USB flash drive might not work exactly like it does when booted natively. Things like Ubuntu's casper persistent feature won't work. Some distributions might not even boot, or will boot with errors.
This is because the volumes on the device are mounted by Windows, preventing VirtualBox from gaining full access. In order to fix these issues, you can use a tool called LockDismount. Then simply run the tool (using the following steps), prior to starting the Virtual Machine that is tied to your USB.
- Download LockDismount tool.
- Launch the exe right before starting your VirtualBox VM
- Select your USB drive from the drop list and Press Lock it!
(optionally you can check Force Dismount)

Now your flash drive should be able to boot in VirtualBox exactly as it does when booted natively on a physical machine.
VirtualBox Boot from USB (Linux)
The following process to boot a USB flash drive in VirtualBox was performed from a running Ubuntu Operating environment. This method should also work for Debian and other Ubuntu Linux based Operating systems.
- Open a Terminal Ctrl+Alt+T, and then type the following and press Enter;
sudo apt install virtualbox - Next, type
sudo fdisk -l(note which device is your USB drive I.E. /dev/sdx)

- Replacing x with your actual device letter found from step 2, type
sudo vboxmanage internalcommands createrawvmdk -filename ~/usb.vmdk -rawdisk /dev/sdx </span> - From the open terminal, type the following to start the program.
sudo virtualbox - Now navigate to Machine -> New and proceed create a New Virtual Machine.
- When prompted for a Virtual Hard Disk, tick use existing hard disk, then browse to your Home directory and select usb.vmdk.
- Once you've finished creating your New Virtual Machine, click Start.
If all went smoothly, you should now be able to boot a USB flash drive from VirtualBox on the Linux Host.
Booting from USB Drives in VirtualBox (Mac OS X)
-
- Download and install VirtualBox for OS X Hosts via the .dmg file.
- Open a Terminal, type the following and then press Enter
diskutil list(make note of which disk is your USB drive I.E. /dev/disk#)
- Replacing # with the disk number of your USB drive, type
diskutil unmountDisk /dev/disk# - Again, replacing # with your actual disk number, type
vboxmanage internalcommands createrawvmdk -filename ~/usb.vmdk -rawdisk /dev/disk# - Once more, replacing # with the disk number, type
diskutil unmountDisk /dev/disk# - Finally, to start the program with root access, type
sudo virtualbox - Next, Proceed to create a New Virtual Machine.
When prompted for a Virtual Hard Disk, tick use existing hard disk. - Then, browse to your Home directory and select usb.vmdk.
- Once finished creating your New Virtual Machine, click Start.
You should now be able to boot a USB flash drive in VirtualBox on the Mac OS X host, while retaining the ability to boot from the drive natively as well.
Note: When first attempting to boot a USB Flash Drive in VirtualBox from within Windows, you may receive an Error similar to this:
Failed to get device handle and/or partition ID for 0000000001e92d20 (hPartitionDevice=0000000000000cd5, Last=0xc0000002/1) (VERR_NEM_VM_CREATE_FAILED).
In which case, you need to set hypervisor launch type to off. To do this;
- Open a command prompt as Administrator. I.E; (Win Key+X) and then press A
- Type the following command string into the terminal, then press Enter
bcdedit /set hypervisorlaunchtype off - Reboot your computer.
- Try to boot your USB flash drive from VirtualBox, again.
FAQ: Booting a USB Flash Drive in VirtualBox
Why can't I boot from my USB drive directly in VirtualBox?
By default, VirtualBox doesn't support booting directly from USB devices. However, you can work around this limitation by creating a virtual hard disk (VMDK) file that maps to your USB device. This virtual VMDK file tricks VirtualBox into recognizing your USB drive as if it were a virtual disk, allowing you to boot from it.
What is the "VBox USB passthrough" feature?
VBox USB passthrough is a feature that allows VirtualBox to access USB devices connected to the host machine. While this feature may be necessary for some setups, the method described here uses the VMDK workaround and does not rely on passthrough. If passthrough is required, you may need to enable it in VirtualBox's settings.
How can I fix the "VERR_NEM_VM_CREATE_FAILED" error when booting from USB in VirtualBox on Windows?
This error is usually caused by Hyper-V being enabled in Windows. To resolve it, you can disable Hyper-V by running the following command in an elevated Command Prompt:
bcdedit /set hypervisorlaunchtype offAfter disabling Hyper-V, reboot your computer and try booting the USB drive again in VirtualBox.
How can I enable persistence when booting a USB in VirtualBox?
Persistence allows you to save changes made during a session, which would otherwise be lost on reboot. To enable persistence, you need to dismount your USB drive using the LockDismount tool before starting the VirtualBox VM. This tool ensures that Windows does not lock the device, allowing VirtualBox to gain full access.
Can I use this method for any Linux distribution?
While the method should work for most Linux distributions, certain ones (like Ubuntu with Casper persistence) may not work immediately due to Windows mounting restrictions. Using the LockDismount tool before starting the VM can help with these issues.
How do I undo the changes I made if I no longer want to boot from the USB drive in VirtualBox?
If you no longer need to boot from the USB device in VirtualBox, you can simply delete the usb.vmdk file from your VirtualBox directory. You can also remove the associated virtual machine if you no longer wish to use it. This will revert VirtualBox to its default state.
Can I boot from a USB on VirtualBox if my computer runs Mac OS X?
Yes! The method described for Mac OS X users should work similarly to the process for Windows and Linux. Be sure to unmount the USB drive before creating the VMDK, and use the appropriate disk number when configuring the VMDK file.
What should I do if VirtualBox doesn't recognize my USB device?
If VirtualBox doesn't recognize your USB device, ensure that you've correctly created the VMDK file and that it points to the correct disk. Also, make sure VirtualBox has the necessary permissions to access USB devices, especially on macOS or Linux systems. You may also want to verify that your USB device is working properly on your host system.
Final Thoughts
In this guide, we covered three methods for booting from a USB drive in VirtualBox. With these techniques, you can successfully run a portable operating system within a vbox virtual environment. If you found this guide helpful, you may also be interested in learning how to Boot VirtualBox from USB.