
Easily create a bootable Live KNOPPIX USB flash drive using the Universal USB Installer. KNOPPIX is a free, open source, Debian based Live Linux distribution. It's well known for its portability, automatic hardware detection, and usefulness in system recovery, diagnostics, and hardware testing.
Booting KNOPPIX Live from a USB Drive

About KNOPPIX Linux
KNOPPIX allows users to run a full Linux environment from a USB drive, CD, or DVD, no installation required. Originally developed by Klaus Knopper, it's one of the earliest and most reliable live Linux systems. It's ideal for secure browsing, data recovery, system repair, or testing hardware compatibility. By utilizing the persistent KNOPPIX image or partition (overlay feature), it is possible to store files permanently in live mode. Whereby your personal settings and added software survive during each reboot.
Key Features
- Live OS: Runs without installing to your hard drive.
- Debian Based: Built on stable Debian.
- Automatic Hardware Detection: Excellent compatibility.
- Persistence Support: Uses a KNOPPIX-DATA overlay system.
- Lightweight Desktop: LXDE or KDE options.
- toram Mode: Load fully into RAM for speed.
System Requirements
-
- USB flash drive (4GB minimum, SSD recommended)
- Latest KNOPPIX ISO
- Windows, Linux, or macOS computer
KNOPPIX vs Ubuntu Live Comparison
Both KNOPPIX and Ubuntu Live run directly from a USB stick, but they serve slightly different purposes. Use the table below for a quick comparison and the FAQs for more detailed explanations.
| Feature | KNOPPIX Live | Ubuntu Live |
|---|---|---|
| Primary Use | System recovery, hardware testing, portability | Testing Ubuntu, installing, or temporary live use |
| Size | Smaller footprint, lightweight | Larger ISO (~4GB+), more resource-heavy |
| Desktop Environment | LXDE or KDE (lightweight, fast) | GNOME by default (heavier on older hardware) |
| Persistence | Built in support (KNOPPIX-DATA overlay) | Yes, (casper-rw) manually or auto using YUMI |
| Hardware Detection | Excellent automatic detection | Strong, geared toward modern PCs |
| Best For | Recovery tools, older hardware, portable Linux toolkit | Daily use, trying Ubuntu, or preparing for install |
Creating a KNOPPIX Live USB on Windows
Use the YUMI Multiboot bootable USB creation tool to prepare your Live KNOPPIX USB stick.
- Download YUMI
- Get the latest KNOPPIX ISO
- Run YUMI and follow these steps:
- Select your USB device.
- Choose "KNOPPIX" from the distribution list.
- Browse to the ISO file and click Create.

Note: Persistence isn't currently working on newer versions such as KNOPPIX 9.1 using the YUMI method. But once booted from the prepared drive, you can use the flash-knoppix script to create a second fully persistent KNOPPIX 9.1 bootable flash drive... see below;
Create a Persistent KNOPPIX USB Using flash-knoppix
This is the way to create a fully persistent KNOPPIX USB from another running KNOPPIX Live USB.
- Boot from a KNOPPIX Live USB (created using YUMI).
- Insert a second flash drive.
- Open a terminal, type the following command and press enter:
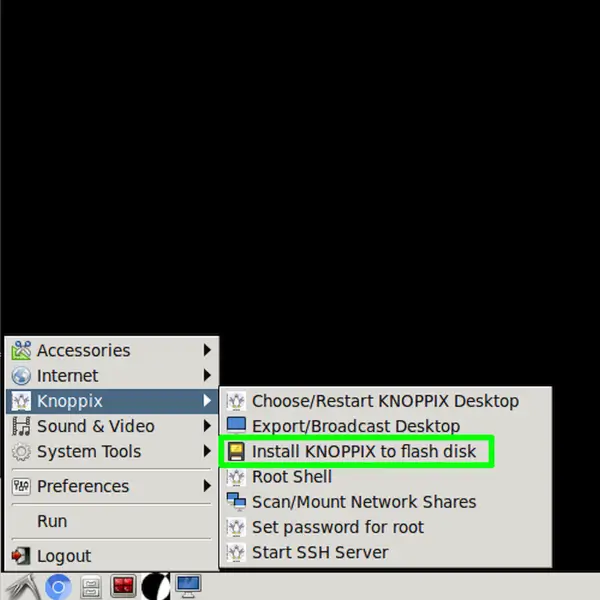
sudo flash-knoppix(or locate the script from the start menu > Knoppix > Install KNOPPIX to flash disk):
- Select
rto install to a removable flash drive.

- Select the target flash drive, and follow the instructions in the prompts that follow.
- Open a terminal, type the following command and press enter:
Benefits of using this method:
- Creates the proper partition layout
- Configures bootloader correctly
- Integrates
KNOPPIX-DATApersistence cleanly - Is ideal for a long term portable KNOPPIX system with a data overlay image.
Using dd for Windows to Make a Persistent KNOPPIX USB
This method will create an out of the box Live KNOPPIX 9.1 Persistent bootable USB. It performs a raw write of the ISO directly to the USB device and is recommended for advanced users. Warning: As usual, this process will wipe the entire selected disk including all existing partitions.
- Download dd for Windows.
- Insert the USB flash drive.
- Open Command Prompt with administrator privileges Press Win + R, type
cmd, then press Ctrl + Shift + Enter. - Change to the dd directory Switch to the folder that contains
dd.exe:cd c:\path\dd.exe - Clear the USB drive using diskpart Launch the disk partitioning utility:
diskpartShow all attached disks:
list diskSelect the USB drive (replacing #):
select disk #Erase all partition information on the disk:
cleanExit diskpart:
exit - Write the ISO to the USB Immediately after cleaning the disk, write the image to the device. Replace
path-to.isowith your actual path and iso file. ReplaceXwith your USB disk number).dd if=path-to.iso of=\\.\PhysicalDriveX bs=4M --progress
Make a KNOPPIX Persistent Using Win32 Disk Imager
You can also use the Win32 Disk imager from Windows to rawwrite the KNOPPIX ISO onto your flash drive. This will also result in the potential for persistence, and the free space at the end of the disk can be used to create another partition to be used for general storage across multiple systems.
-
- Get Win32 Disk Imager.
- Insert the USB drive and launch the program.
- Select the ISO file and your USB device, then click Write.
- Confirm overwrite warnings and wait for completion.
- Safely eject the drive when finished.
Creating a Persistent KNOPPIX USB on Linux
Linux users can also use the dd command to write the ISO to a USB device. Persistence working out of the box on KNOPPIX 9.1:
- Download the KNOPPIX ISO.
- Open a Terminal window.
- Find your USB drive:
lsblk - Unmount the device (replace
Xwith your actual device letter):sudo umount /dev/sdX1 - Write the ISO to the USB:
cd ~/Downloads sudo dd if=knoppix*.iso of=/dev/sdX bs=4M status=progress oflag=sync
Creating a KNOPPIX Live USB on macOS
- Download the ISO from the official KNOPPIX site.
- Insert your USB drive and identify the disk:
diskutil list - Unmount it (e.g.
/dev/disk2):diskutil unmountDisk /dev/disk2 - Write the ISO (replace with your actual path and disk):
sudo dd if=~/Downloads/knoppix.iso of=/dev/rdisk2 bs=4m - Once complete:
diskutil eject /dev/disk2
Booting KNOPPIX from USB
- Restart your PC.
- Enter your BIOS/UEFI menu (usually F2, F12, ESC, or DEL during boot).
- Set your USB device as the primary boot option.
- Save and exit. KNOPPIX should now boot from your USB.

Tip: If the system doesn't boot, try disabling Secure Boot or enabling Legacy Boot mode in your BIOS settings.
Using KNOPPIX with Persistent Storage
What is KNOPPIX Persistence?
KNOPPIX persistence allows you to save files, installed programs, browser settings, and system changes directly on the USB drive. These changes are stored in a writable overlay called KNOPPIX-DATA and are automatically loaded on each boot.
How Persistence Works in KNOPPIX 9.x
When the KNOPPIX ISO is written directly to a USB device using a raw write method such as dd or Win32 Disk Imager:
- KNOPPIX detects available writable space on the USB drive.
- On first reboot, it creates a persistent
KNOPPIX-DATApartition or image. - No special boot cheatcodes are required in normal cases.
Once created, persistence is automatically used on future boots.
File vs Partition Persistence
- If the USB uses FAT32, persistent image files are limited to 4GB due to filesystem restrictions.
- If an ext2, ext3, or ext4 partition is used, larger persistent storage is supported.
- The official
flash-knoppixtool creates the optimal partition layout automatically.
Manual Persistence Setup (Advanced)
In advanced scenarios, you can manually create a partition or file named KNOPPIX-DATA. KNOPPIX will automatically detect and use it. Older cheatcodes such as:
knoppix myconfig=scan home=scanare generally not required for modern 9.x raw written installations but may still function for custom configurations.
Recommended Performance Boot Option
If your system has enough RAM (4GB or more), you can improve performance by loading KNOPPIX fully into memory:
knoppix toramThis allows the USB device to be removed after boot and often results in faster system responsiveness.
Root Access in Knoppix Live Session
Unlike many modern Linux distributions, Knoppix Live does not require a root password by default. The root account is unlocked in a standard live session, making administrative tasks straightforward for troubleshooting, recovery, and system maintenance.
How to Access Root in Knoppix
- Open a Terminal
- Type:
sudo su - - Or simply:
su -
Root access is granted immediately without a password prompt.
Set a Root Password (Optional)
If you want to define a root password during a live session:
passwd rootYou will be prompted to enter and confirm the new password.
Boot Directly Into Root (Single User Mode)
At the Knoppix boot prompt, enter:
knoppix 1This starts the system in single user mode for advanced recovery tasks.
Understanding Permissions in Knoppix
When working as root, you may need to modify file permissions, especially for external drives or persistence files. If you are unfamiliar with Linux permissions, see our detailed guide:
How to Use the chmod Command in Linux
This guide explains and covers both numeric and symbolic permission modes and how to safely modify read, write, and execute access across various flavors of Linux.
Granting Sudo Privileges to a User
Although Knoppix defaults to unrestricted root access in live mode, some users prefer a standard Linux workflow using sudo. For persistent Knoppix installations or remastered systems, you can add a user to the sudoers list. Simple instructions are available here:
How to Add a User to the Sudoers List
This is useful when building a customized Knoppix ISO or using persistence with separate user accounts.
Security Considerations in Live Mode
- Live sessions are temporary unless persistence is enabled.
- Root access without a password is convenient but not suitable for multi-user environments.
- If using persistence, consider setting a root password for added protection.
- Always verify file permissions before modifying system directories.
KNOPPIX Live Root and Permissions
Does KNOPPIX have a default root password?
No. The root account is unlocked and does not require a password in a default live session.
Can I lock the root account?
Yes. After setting a password with passwd root, you can manage account behavior using standard Linux tools.
Is sudo required in KNOPPIX?
Not in the default KNOPPIX live USB environment. Though you can configure sudo privileges if you want a more traditional Linux setup.
Should I change permissions on persistence files?
Only if necessary. Improper permission changes can prevent persistence from loading properly. Refer to the chmod guide before making changes.
Other Frequently Asked Questions
What is KNOPPIX?
A Debian-based Live Linux operating system that runs directly from USB, CD, or DVD.
Can I save changes with KNOPPIX?
Yes. If persistence is enabled, your files and configurations are saved between sessions.
What is "toram" mode?
Loads the entire system into RAM for faster performance, especially on systems with 2–4GB of memory or more.
Does KNOPPIX work with modern hardware?
Yes. It features robust automatic hardware detection and supports most current components.
What desktop does KNOPPIX use?
LXDE by default; some versions also offer KDE.
Is KNOPPIX better than Ubuntu Live?
KNOPPIX is ideal for portable Linux toolkits, data recovery, diagnostics, and running on older machines. Lightweight, fast, and detects hardware automatically.
Ubuntu Live is better for testing Ubuntu, installing a full OS, or running on modern PCs. More resource-intensive but designed for daily use.
Does KNOPPIX support persistence better than Ubuntu Live?
Yes. KNOPPIX has built in persistence using the KNOPPIX-DATA overlay. Ubuntu Live also supports persistence, but differs in that it requires creating a casper-rw file or partition manually.
Which is better for older hardware?
KNOPPIX is better suited for older PCs due to its lightweight desktop and small ISO size. Ubuntu Live’s GNOME desktop may run slower on older machines.
Can I use Ubuntu Live for recovery and diagnostics like KNOPPIX?
Ubuntu Live can be used for basic recovery or live sessions, but KNOPPIX comes with built-in tools for system diagnostics, data recovery, and hardware testing, making it more convenient.
Final Thoughts on Booting KNOPPIX from USB
Booting KNOPPIX from USB drive gives you a powerful, portable Linux system for recovery, diagnostics, or secure computing on any machine. Built for speed and vast support for both the most modern and ancient hardware, along with support for persistence built right in, this is truly a personal Linux desktop anyone could easily use while on the go;
It has always been a 🐧 Pendrivelinux favorite, you know :)
For best performance, use a high quality SSD based USB flash drive. Download and create a persistent KNOPPIX Live USB and take your Linux portability to the next level!