
Move WUBI Ubuntu to an External USB Drive: In this comprehensive tutorial, we show you how to move your existing WUBI Ubuntu installation to an external USB drive. This enables you to carry your personalized Ubuntu environment with you and boot it on any compatible PC without modifying your internal drives.
Because WUBI uses loop mounted files that act as partitions, the original Windows NTFS partition remains intact and fully accessible for storage. Moving your WUBI installation to USB is perfect for portable Linux usage and testing Ubuntu without partitioning.
Update: Legacy WUBI vs. New Grub 2 Method
Legacy Method: The original WUBI system used the Windows bootloader and loop-mounted files. This method is now obsolete but is provided here for reference.
New Recommended Method: WUBI has transitioned to using the modern Grub 2 bootloader system. This method is more robust, supports newer hardware, and is the best choice today.
Legacy WUBI Move Method (Using Loop Files & NTFS)
Prerequisites
- Existing WUBI Ubuntu installation on Windows XP
- External USB hard drive with capacity larger than your Ubuntu folder
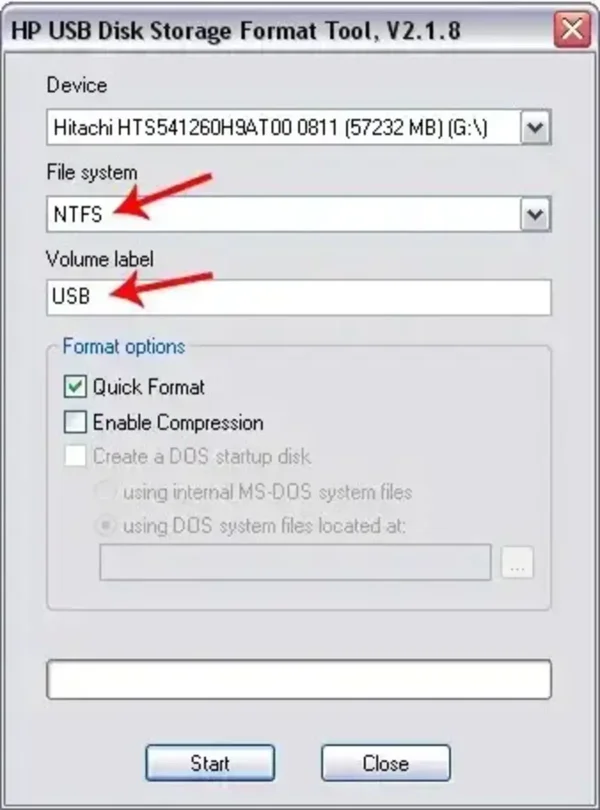
- HP USB Disk Storage Format Tool or similar
Step by Step Instructions to Move WUBI
- Format your USB drive with NTFS and label it
USBusing the HP USB Format Tool.
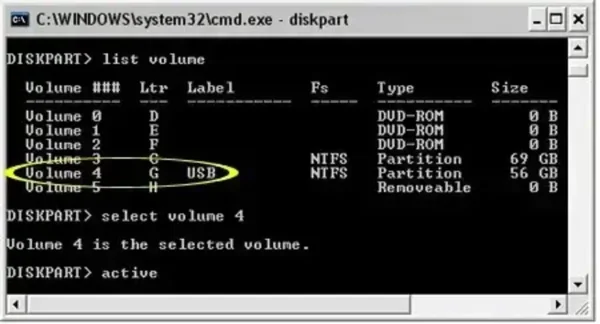
- Activate the USB volume as bootable:
- Open Run > type
diskpart> press Enter - At the DiskPart prompt, enter:
list volume
select volume X  (replace X with your USB volume number)
active
exit
- Open Run > type
- Copy WUBI files (enable hidden files view) from your local drive to the USB root:
ubuntu
boot.ini
NTDETECT.COM
ntldr
wubildr
wubildr.mbr

- Edit
menu.lst:- Open
ubuntudisksbootgrubmenu.lston USB - Replace all
root=UUID=...entries withroot=LABEL=USB - Save the file
- Open
- Boot from the USB drive:
- Set BIOS boot order to USB
- At boot menu, select Ubuntu

Note: To use only the portable Ubuntu install, uninstall WUBI from your PC after removing the USB drive to avoid accidental deletion of USB files.
New Recommended Method: Moving WUBI Ubuntu to USB Using Grub 2
This updated method leverages the Grub 2 bootloader to create a fully portable Ubuntu installation on a USB drive. It provides better compatibility, improved boot performance, and a more modern Linux experience.
What You Need
- Existing WUBI installation (Ubuntu 12.04 or later recommended)
- External USB hard drive or USB 3.0 flash drive with sufficient space
- Ubuntu Live USB or CD for boot repair
- Basic familiarity with Linux terminal commands
Step 1: Prepare the USB Drive
- Backup any important data on the USB drive.
- Use a partition tool (GParted or Windows Disk Management) to create a primary partition formatted as ext4 on the USB drive.
- Set the partition bootable (using GParted, check "boot" flag).
Step 2: Copy Your WUBI Installation
-
- Boot into your existing WUBI Ubuntu.
- Mount the new USB ext4 partition:
sudo mkdir /mnt/usb
sudo mount /dev/sdX1 /mnt/usb-
- Copy the entire WUBI Ubuntu root filesystem (your
/home,/etc, and other folders) to the USB partition:
- Copy the entire WUBI Ubuntu root filesystem (your
sudo rsync -aAXv / --exclude={"/mnt/usb/*", "/proc/*", "/sys/*", "/dev/*", "/tmp/*", "/run/*", "/media/*", "/lost+found"} /mnt/usbStep 3: Install Grub 2 on the USB Drive
-
- Install Grub bootloader to USB:
sudo grub-install --root-directory=/mnt/usb /dev/sdX- Replace
/dev/sdXwith your USB device (e.g.,/dev/sdb), do not include partition number.
Step 4: Configure Grub to Boot Ubuntu from USB
-
- Edit the Grub config on the USB drive:
sudo nano /mnt/usb/boot/grub/grub.cfg-
- Add or edit an entry similar to:
menuentry "Ubuntu Portable USB" {
    set root=(hd0, 1)
    linux /boot/vmlinuz root=/dev/sdX1 ro quiet splash
    initrd /boot/initrd.img
}- Replace
/dev/sdX1with your USB partition identifier.
Step 5: Test Booting From USB
- Reboot your computer and enter BIOS or boot menu.
- Select your USB drive as the boot device.
- Ubuntu should boot from the USB with your full portable environment.
Troubleshooting
- If booting fails, try booting from an Ubuntu Live USB and run
boot-repairtool to fix Grub on the USB. - Ensure that UUID or device names in
grub.cfgmatch your USB partitions.
Summary
The legacy move WUBI to USB method provides a simple portable Ubuntu environment running on NTFS loop files, suitable for older systems and testing. However, the Grub 2 method offers a more robust, faster, and modern portable Ubuntu experience by installing Ubuntu directly onto a USB partition with a native Linux filesystem.
Choose the method that best fits your needs and hardware compatibility. For most users, we recommend the new Grub 2 portable Ubuntu installation.