Create a portable MCNLive USB Flash Drive using the Live CD, YUMI from Windows or dd in Linux. MCNLive is a live CD based on Mandriva Linux, designed to run smoothly on most desktop and notebook computers. Like Mandriva, it includes a full suite of tools, networking utilities, web browsers, media players, graphical software, and office apps.
This lightweight Linux distribution has everything a typical user might need. One standout feature is its simple to use graphical installer that supports both USB and internal hard drive installations.
Distribution Home Page: Archived Project Page
Minimum Flash Drive Capacity: 512 MB
Persistence Feature: Yes
How to Create a Portable MCNLive USB (Graphical Method)
- Download the MCNLive ISO.
- Burn the ISO to a CD and boot your system from the Live CD.
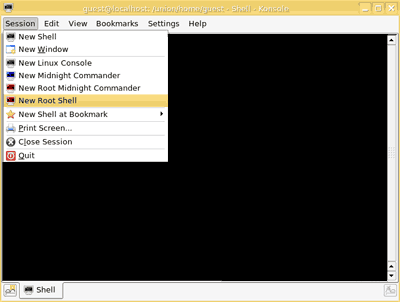
- Open a terminal and select Session -> New Root Shell:

- Run the following command to identify your USB device:
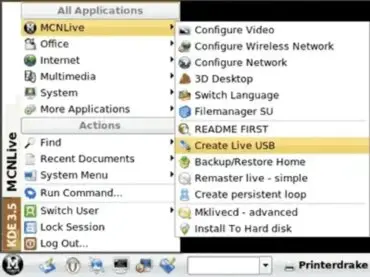
fdisk -l - Navigate to MCNLive -> Create Live USB from the Start Menu:

- Follow the on-screen prompts to complete the USB installation.
Booting from Your USB Drive
- Reboot your computer.
- Use the appropriate BIOS or UEFI hotkey to enter the boot menu.
- Set your USB drive as the first boot device.
- Save and exit. Your system should now boot from the USB drive.
Using the dd Command (Terminal Method)
If you prefer a command line approach, follow these steps to write the MCNLive ISO directly to a USB stick:
- Open a terminal window.
- Identify your USB device with:
lsblk - Run the following command, replacing paths as needed:
sudo dd if=/path/to/MCNLive-Delft.iso of=/dev/sdX bs=4M status=progressMake sure to replace
/dev/sdXwith your actual USB device identifier. - Once the write is complete, safely eject the drive:
sudo eject /dev/sdX
Install MCNLive with YUMI (Multiboot USB Tool)
YUMI offers a super simple way to set up MCNLive on a USB, especially if you're working with multiple ISOs.
- Download YUMI.
- Launch the program and choose your USB drive.
- Prepare the drive when prompted.
- Click Browse to locate your downloaded ISO file.
- Check the option to Create a bootable disk using ISO.
- Click Next and follow the instructions to begin installation.
- After completion, YUMI will confirm success.
- Reboot and select your USB as the first boot device (see instructions above).
Using YUMI allows you to include this distribution alongside other Linux distributions or tools, making your USB drive a flexible multiboot solution.
